INTRODUCTION & Information
Task Force Reaper takes pride in having airborne personnel. However, Airborne Training itself is not required upon entry to any member, it must be earned. All special operations forces in the task force do hold a prerequisite with necessary requirements for Jump School. During this Jump School, also referred to as the Basic Airborne Course, members will be taught everything regarding Airborne Operations conducted within a conventional and unconventional scale. This manual is also used as reference in all Airborne related exercises in the unit. This manual also uses references on terminology which can be found in the Preparations Course Manual.
Acts of Unsafety
During official parachutist events, it is important that all personnel follow strict safety instructions. Any unsafe acts will result in verbal warning as mistakes do happen. A second offense will result in removal from the training.
1. Do not communicate with the pilots or any other active personnel in the vehicle, only communicate when spoken to directly by personnel with an active lead position. This is to avoid irritated or conflicted cohesion.
2. Do not touch anything within any vehicles unless told directly to do. Access to inventory and to eject will occur, however, personnel should only do so while directly told to do so.
Jump School
The Parachutist School, modelled after the United States Army Airborne School – widely known as Jump School – conducts the basic paratrooper (military parachutist) training for the United States Armed Forces. It is operated by the Task Force Reaper Headquarters. The Airborne School conducts the Basic Airborne Course, which is open to troops of both genders from all branches of the United States Department of Defense, Reserve Officer Training Corps, and allied military personnel. All students must volunteer to attend the course.
Ground Week
The first three days of the Basic Airborne Course is dedicated to teaching prospective troopers how to land properly to minimize the potential for injury and general familiarization with respective parachute systems, such as the T-11 and T-10 variants. The T-10D is a round-shaped parachute, and the T-11 is a square-shaped parachute both using static line extraction with a descent rate of 18–23 ft/sec and 16–20 ft/sec respectively, dependent on the weight and equipment outfitting of the individual jumper. Prospective troopers are taught how to wear the parachute harness correctly and how to use the special training gear. During Ground Week, prospective troopers will spend the majority of time learning, practicing, and perfecting their Parachute Landing Fall (PLF) and proper exit technique from the aircraft.
To practice the PLFs, troopers will jump from platforms of various heights into sand or pebble pits, simulating the final stage of parachute landing. This maneuver teaches a trooper to transfer the energy of his fall (landing) up the sides of the lower legs and knees, all the way up to side of the upper body. During this period Black Hat instructors closely observe and correct the prospective troopers body position and technique making corrections. This week culminates in practice landings from the Lateral Drift Assembly, a 'zip line' type assembly which simulates making contact with the ground travelling at speed and in various directions. In many cases the first use of the 34-foot tower is made at the end of this period of training.
To continue to week 2, prospective troopers must pass all jump training test as well as the standard Physical Fitness Test (PFT). Ground Week is the phase of training in which the largest number of personnel washout. Depending on circumstances personnel who fail to advance are either dismissed from the course outright or less commonly recycled back to an earlier class for additional training.
Tower Week
The second week of Jump School consists of two days and concentrates on jump towers. Prospective troopers will continue using the 34-foot tower in addition to the swing-landing trainer, a suspended harness trainer, and occasionally the 250-foot tower. Troopers will become familiar with the mock door trainer to simulate mass exit training (how to exit an aircraft in flight). Additionally, prospective troopers are taught the different phases of parachute flight from aircraft exit, through opening shock and chute deployment, then onto the deployment of the risers, steering the chute, and all the way to landing. One critical skill learned is how to identify a parachute malfunction and deal with it. This may involve emergency procedures including when and how to deploy the reserve parachute. Troopers also learn about oscillation, landing falls, and how to recover from drag. The T-10D and T-11 parachutes are partially steerable using the parachute risers and students are taught the different techniques to steer their chutes into the wind and aim for the Point of Impact at the center of the Drop Zone. The second week completes a trooper's individual skill training and begins building team effort skills. Once successfully completing the skills required and the physical fitness requirements, a trooper will progress to jump week.
Jump Week
Finally, troopers get to practice their new skills while jumping out of real aircraft in flight and performing combat jump operations. Jump Week consists of three to five days. The C-130 or a larger aircraft will pick up the paratrooper students in front of a designated hangar. From there it is a relatively short flight to Glory Field (commonly referred to as "Drop Zone"), where all of the training jumps are accomplished.
The aircraft fly at 400 meters above the ground at an airspeed of about 130 knots. After the flight crew completes the pre-drop and slow-down checklists, parachutists rise out of their seats and move at the jumpmaster's direction to one of two paratroop doors (on each side of the aircraft). At "green light" one stick of paratroopers exit the plane – jumpers continue to move to the door until the red light is illuminated. At that point the aircraft will begin its racetrack maneuver circling back to the beginning of the drop zone and continue to do this until all jumpers have jumped.
A trooper must complete 5 to 10 jumps, normally including at least one night jump and one combat jump, to graduate Airborne School. During jump week, the schedule varies and troopers will jump in a variety of configurations from unloaded Hollywood to fully equipped and loaded Combat jumps. Jump Week may seem chaotic but is required to maintain full operational capacity. Immediately after landing on the Drop Zone (DZ), the troopers collect their parachutes and other gear and meet back at the rally point on one side of the DZ, where they wait for a bus to take them back to get ready for their next jump.
The jump schedule varies greatly based on class dynamics, weather, and aircraft. Graduation is normally conducted at 0900 on Friday of Jump Week. However, if there is inclement weather, or other factors delay the scheduled jumps, graduation may be conducted on the Drop Zone following the last jump. All graduates must attend the graduation ceremony, and will be awarded the parachutist wings.
AIRBORNE INSERTION TYPES
There are two Airborne types, that being static line jumps and military free-fall. Both have their own benefits and downsides, below these will be covered.
Static Line Jump
A static line is a fixed cord attached to a stable object. It is used to automatically deploy the ripcord for airborne troopers. And is mainly used for operations where the jump occurs in very low altitudes, these jumps usually occur on altitudes from 120-400 meters.
Within the confines of ArmA 3, the feature of automatically deploying the ripcord is not implemented. This means that the parachutist may have to manually do so immediately after ejection, if no modifications are in place. Not doing so immediately after carries a risk of extreme injury.
Within the confines of ArmA 3, the feature of automatically deploying the ripcord is not implemented. This means that the parachutist may have to manually do so immediately after ejection, if no modifications are in place. Not doing so immediately after carries a risk of extreme injury.
Military Freefall
Military Free-fall is a method of delivering personnel to a designated drop zone via a free-fall parachute insertion. Three techniques are used, High Altitude – Low Opening (HALO), High-Altitude – High Opening (HAHO) and Low Altitude – Low Opening (LALO). In the HALO and LALO technique, the parachutist opens their parachute at a low altitude after freefalling for a period. In HAHO, the parachutist deploys their parachute at a high altitude, often just a few seconds after jumping from the aircraft.
High Altitude Low Opening / Low Altitude Low Opening
In a typical HALO exercise, the parachutist will jump from the aircraft, free-fall for a period of time at terminal velocity, and open their parachute at an altitude as low as 150 meters. The combination of high downward speed, minimal forward airspeed, and the use of only small amounts of metal helps to defeat radar and reduces the time a parachute might be visible to ground observers, enabling a stealthy insertion.
High Altitude High Opening
The HAHO technique is used to airdrop personnel in high altitudes when an aircraft is unable to fly above enemy skies without posing threat to the jumpers. In addition, HAHO parachute jumps are employed in the covert insertion of parachutists into enemy territory, in circumstances where the covert nature of an operation may be compromised by the loud noise of parachutes opening at low altitude. Meanwhile all the above can be executed with the steerable parachute, only the static line jump can be done with the non-steerable parachute.
JUMP ORGANIZATION
In many jumps, there will be multiple elements inserting together. To coordinate the insertion of this it is important that every member is aware of the whole process, from the different perspectives. Below is a stage-map covering the different stages and how their procedures. During all stages the JUMP MASTER will coordinate everything together with the Pilot and Co-Pilot, which are manning the aircraft for insertion. Everyone participating in the insertion regardless of rank will have to follow the protocols of the Jump Master.
Stage 1 – Briefing
In this stage, the JUMP MASTER will brief all parachutists participating in the insertion on the jump procedures, these are identical each time but are mandatory for the JUMP MASTER to hold them, it covers the jump procedures and radio procedures as well with general safety rules.
Stage 2 – Parachute File
A Parachute Line will then be formed, this is a normal FILE formation but with spacing between each participating elements. This spacing if any, should not be bigger than 3 meters and are only there for the Jump Master to notice the split of elements. It’s important that each Squad Leader is in the front of his element and that each Team Leader is in front of his team.
Stage 3 – Equipment Check
Jump Master will now inspect all equipment for all personnel that are in the file formation. This is to make sure that all personnel have the right equipment for the insertion.
Stage 4 – Number Assignment
The whole file formation will now receive its numbers, these numbers are assigned to all jumping personnel in the aircraft. It’s the responsibility of each parachutist to remember his assigned number.
Stage 5 – Number Verification
Each parachutist will now be asked to state his designated number, starting from the front of the line and ending at the rear of the line. If any number is not stated, failure on stage 4 will be corrected immediately.
Stage 6 – Loading Up
All personnel will now board the aircraft one-by-one, stating his NUMBER and “IN” when he has fully mounted up, allowing the next line to load up. Example “1, IN” – “2, IN”. etc. Number 3 should never mount up before Number 2 has stated that he is in. During this the pilots will be conducting their pre-flight checks and do communication with other elements, so it’s important that the Jump Master is able to keep full count. When all personnel have mounted up, the Jump Master will call out on specified frequency “All personnel mounted up in (CALLSIGN, NUMBER & AIRCRAFT TYPE), all checks green and ready for deployment”.
Stage 7 – On Route to the Drop Zone
During the time in the aircraft, there may be a lot of communication between ground elements and air elements. Only ACTIVE personnel should speak over communications, relaying only necessary information. The only exception is that if a member must dismiss himself from his gaming platform for a short amount of time, they must immediately state their name and number to the Jump Master, so he may skip their number. Upon returning to gaming platform, the member must report back in to the Jump Master.
Stage 8 – Approach & Radio Procedure
During the approach and jump the Jump Master will say five different commands, all of these must be observed accordingly. They will be said in following order:
RED LIGHT - This is announced that the aircraft has entered within a 10 minute time frame of the drop zone.
STAND BY – This will be announced, so all personnel are paying attention, this is usually called after red light.
STAND UP – Notice that the jump will commence in 30 seconds and personnel will have to get ready.
HOOK UP (Static Line Only) – Notice that the jump will commence within 15 seconds and personnel will have to get ready.
MAKE READY – The Jump is within 5 seconds of jump.
Personnel will exit the aircraft when their number is being called out. After Make Ready, the Jump order will be given starting with 1 and ending with the last number in the parachute file. There is a 0.5 – 1.0 second break between each number to guarantee that parachutists do not collide into each other.
Stage 9 – Jump & Landing Procedures
When the parachutist's number has been called out, they will dismount from the aircraft. They will instantly go into a free-fall mode, depending on airborne operation they will either drag their ripcord (deploy parachute) immediately or wait until a certain height. The Jump Master will brief all parachutists on the type of jump method prior to the jump.
Before dismounting from the aircraft, the member will say their number and “out”. Example: “2, out”.
This signals the Jump Master that they have successfully left the plane.
When deploying the parachute system, the parachutist will signal on designated radio frequency that the parachute has successfully opened. This frequency is usually the designated jump frequency and not the element frequency. The parachutist will signal by stating "NUMBER, deployed”. Example “4, deployed”.
When the parachutist has successfully landed, it is extremely important to announce this on
the designated unit frequency as well, failure to do so will give the team leader the impression
that the parachutist has been injured or killed.
After a successful landing, the parachutist will be required to maneuver to a designated rendezvous
(rally) point. Their priority while landing will be to find someone else, regardless of what element they are with, and stick together. When approaching someone that might be friendly, to confirm that they are BLUFOR, it is prerogative to yell out a challenge and be sure to have the responder reply with the countersign. In our case, “X-RAY” and “WHISKEY” is used. For allied forces, "STAR" is set as the challenge and "TEXAS" is set as the countersign. Regardless of mission profile or objective, a member should never go search for their team alone unless absolutely necessary. Stick with the first team that is found and move to the rally point, keep going down the chain and find more personnel to link up with. Once the rally point has been reached, the Squad Leader or Platoon Leader will ensure that everyone is present and proceed with further tasking.
If personnel are missing, orders will be given to look for these troopers, the mission will not continue until all troops are accounted for.
JUMP TECHNIQUES AND ALTITUDES
In static line jump, members will have to maneuver from a low altitude, however, their parachute should be deployed immediately. Giving them plenty of time to plan their landing over the small drop zone.
HALO AND HAHO Jumps are different. They have insertions where the troopers jump from altitudes between 1000 meters to 5000 meters. In HALO jumps, the ripcord should not be pulled before around 600 meters, while in HAHO jumps the ripcord should be pulled after 10-15 seconds of the jump depending on the altitude which is being jumped from. For some HAHO and HALO jumps, the usage of oxygen masks are required to avoid suffocation while free-falling.
The HALO technique is also the technique executed when delivering equipment to airborne troops in OPFOR territory.
GREEN LIGHT / RED LIGHT
The Green Light and Red Light system is represented in the aircraft during deployments and dismounts. This is used for the pilots to signal the Jump Master and the passengers in the back when the plane is over the designated Drop Zone and when the plane is jump ready. Both of those criteria’s must be met for the pilots to call Green Light. Red Light is called before and after a Jump, successful or not, it means that no more jumps are allowed from the aircraft, nor should anyone attempt to do so, regardless of where they are in the parachute file.
The Parachutist should never use the light as a reference to make their decision to jump or not. The Jump Master is responsible for keeping clean communication with the pilots, the parachutists at the same time keeping his eye on the light for when the plane have overpassed the DZ.
Jumping on Red Light is not authorized under any circumstances and doing so risks serious injuries on unplanned jumps. Only the designated Drop Zones are cleared for jumps by ground troops and jumping in undesignated areas is a serious strike to the organization of such jumps.
BAD EXITS / BAD JUMPS
Airborne Operations, if executed correctly, rarely have bad exits. But they do occur, and everyone must be trained on what to do if such situation is to happen. Parachutists jumping with equipment weighing more than their own body weight have a greater potential for a bad exit. Bad exits will include rolling, spinning or deploying the parachute system to early. All of these events have the chance of ending with casualties. If the parachute is deployed too quick while doing HAHO and HALO operations where jump doors are used, they have the chance of hitting the aircraft, which can render the personnel unconscious.
Bad jumps do also occur, during free-fall if some personnel are leaned too much to the sides, they can go spinning, this will still allow him to deploy his parachute, but it will be extremely unstable. Lean to the sides with caution.
Bad jumps do also occur, during free-fall if some personnel are leaned too much to the sides, they can go spinning, this will still allow him to deploy his parachute, but it will be extremely unstable. Lean to the sides with caution.
LANDING PRIORITIEs
When jumping it’s extremely important to understand that from the moment the parachutist jumps out of the plane, to the moment they rendezvous with their element, they are fully responsible for themselves. In majority of insertions, the parachute will be steerable, and it’s important to know what to look for and what to avoid.
Airborne operations have little chance of air support in it’s beginning stages, so it’s important that the operation have as little injuries as possible, and personnel present should understand that the ammunition for majority of that operation will be what they have on their body.
• Look for open landing points. Keep eyes open for openings in the terrain and maneuver the parachute towards it.
• Avoid the water at any cost. If a member has managed to get themselves in the water, it will take some time to get themselves out of it. With heavy and wet gear on them, it will only make their situation worse.
• Avoid landing on cliffs, uneven terrain, and thick forest lines. Don’t get stuck in areas which are hard to get out of.
• Always maneuver slightly towards the rally point marker. However, don’t move too close. Rally points are usually not far away from contact points with potential hostile units, getting within the line of visibility for hostile units can compromise the whole operation for all personnel.
• Understand how to maneuver the parachute system. If hitting the ground too fast, it WILL result in injuries and the parachutist may remain combat ineffective until a team is in reach to assist them.
STATIC LINE TTPS
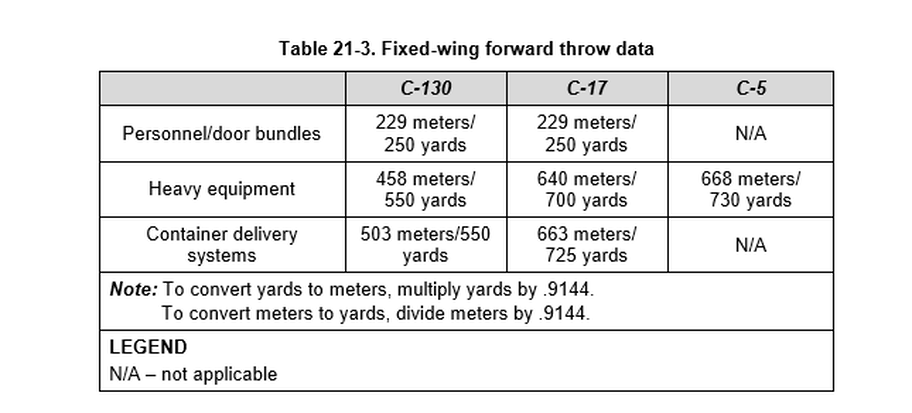
Forward Throw of personnel and supplies
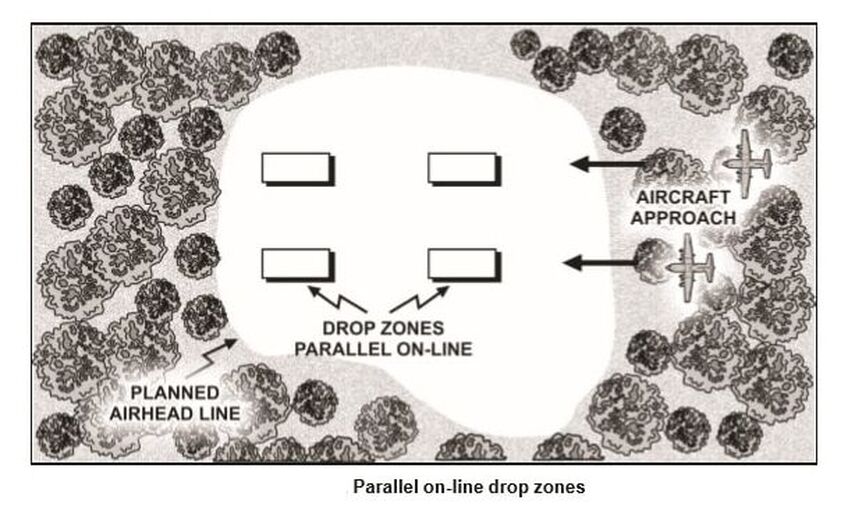
Parallel on-line drop zones
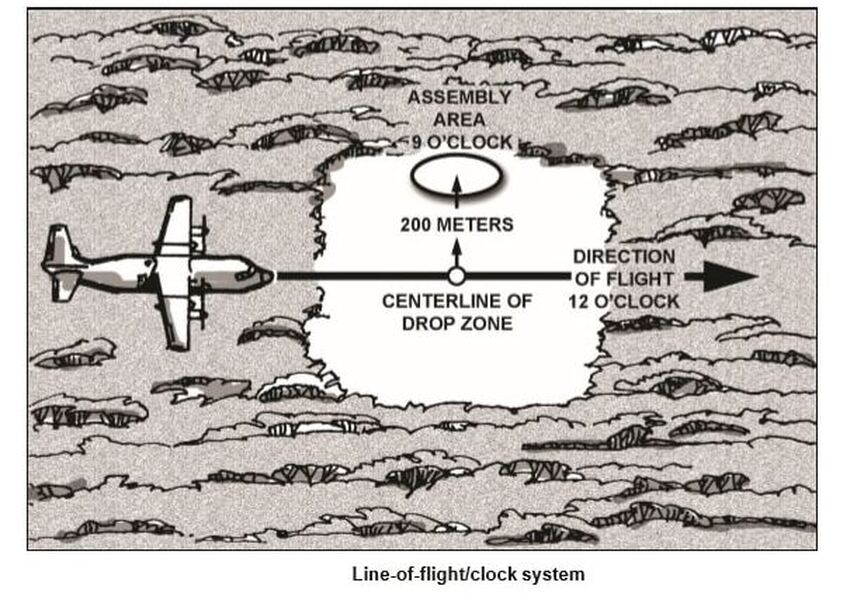
"Clock" method to set a Rally Point
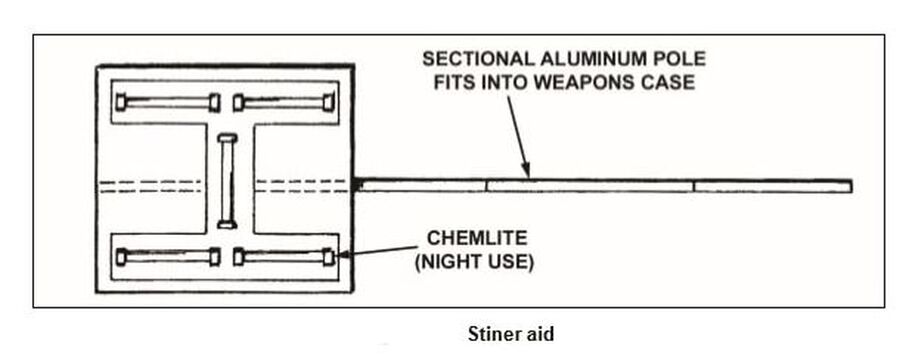
Steiner Aid to mark Assembly Areas
military freefall ttps
Military Freefall Phases
1. Pre-infiltration planning/preparation
2. Actions at the departure airfield
3. Actions in the aircraft during flight
4. Actions during free-fall and under open canopy
5. Actions on the DZ
6. Movement to the and actions on the OBJ
7. Exfil
2. Actions at the departure airfield
3. Actions in the aircraft during flight
4. Actions during free-fall and under open canopy
5. Actions on the DZ
6. Movement to the and actions on the OBJ
7. Exfil
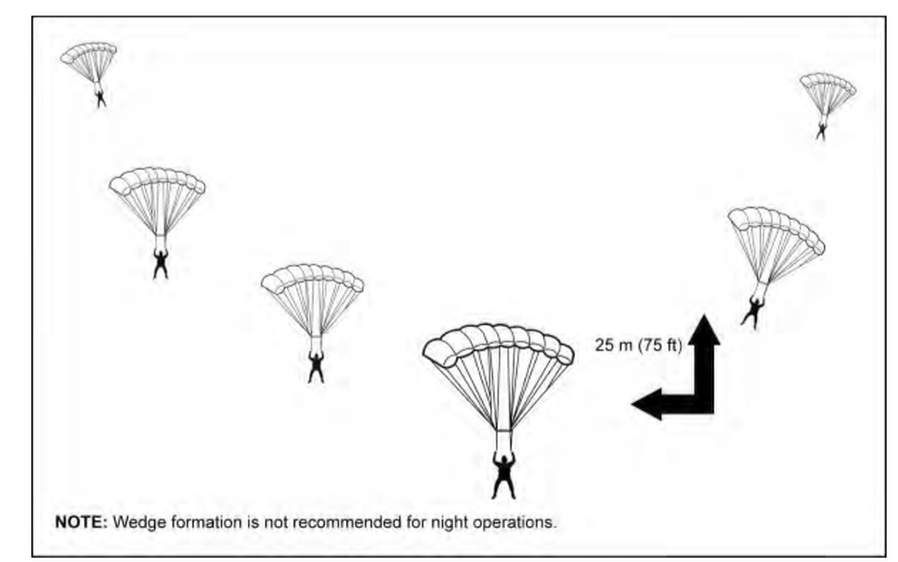
Wedge formation
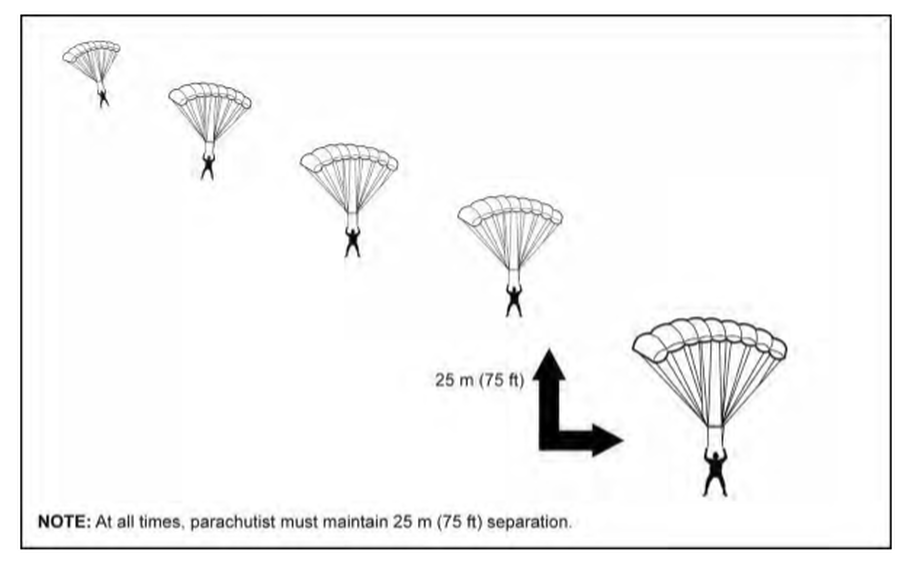
Trail formation
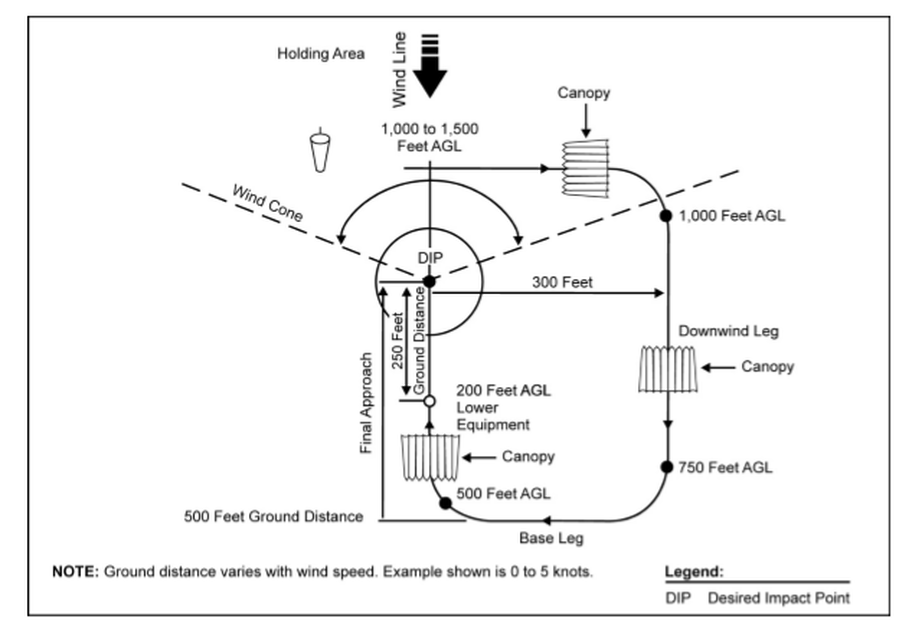
Landing pattern
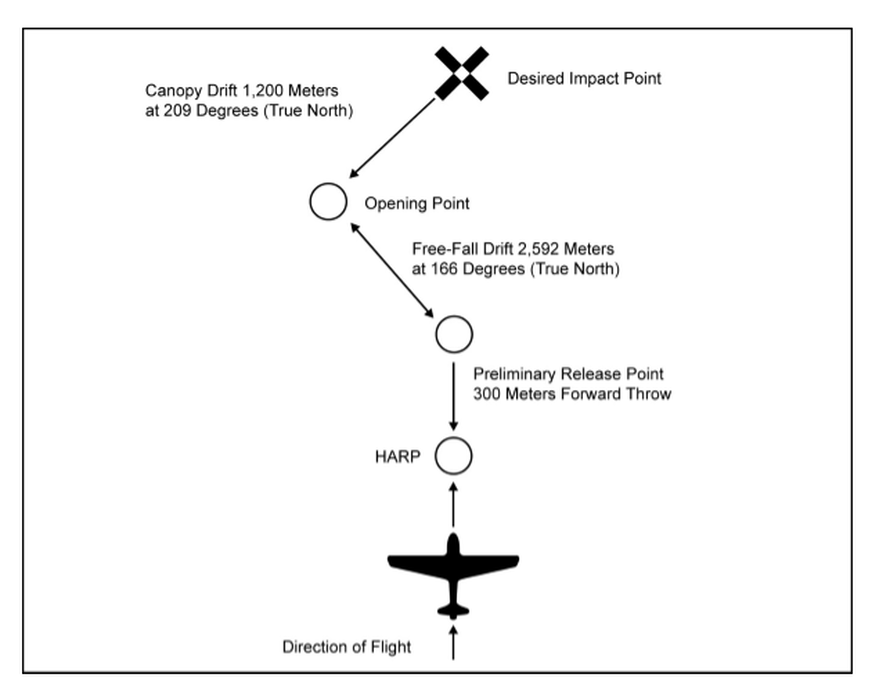
Exit point, free-fall and canopy drift calculations
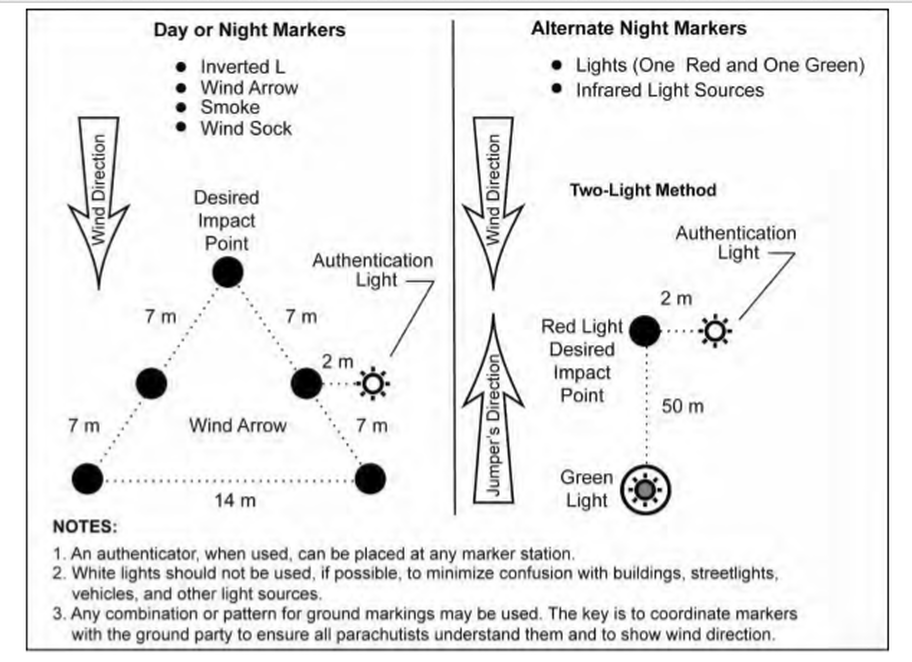
DZ markings