This guide aims to provide a basic understanding of how to operate artillery weapon systems in Arma 3 with ACE3. Whenever you are employed in a indirect fire role, you are expected to use these skills in a competent and accurate manner. A working knowledge of ACE3, map reading, and basic navigation equipment is required. These steps must be practiced and refreshed. The steps presented in this guide will enable the user to conduct a basic fire mission on their own from start to finish allowing them to be effective within an indirect fire crew.
Recommended Items of Necessity
• 1x Map
• 1x Map-combatable flashlight (e.g. Fulton MX-991)
• Compass
• Short or Long Range Radio based on mission necessity (AN/PRC-152 for within 5km, AN/PRC-117F for further than 5km)
• 1x Map Tools
• 1x MicroDAGR GPS
• Earplugs
• Artillery Rangetable / 82mm Rangetable
• ITC's Fire Direction Table
• Galaxy S7 ATAK / Commander's Tablet
• Ammunition applicable to the weapon system
• Artillery piece itself (mortar/tripod, howitzer, etc)
• Textures should be set to HIGH to read indexes.
Setting Up
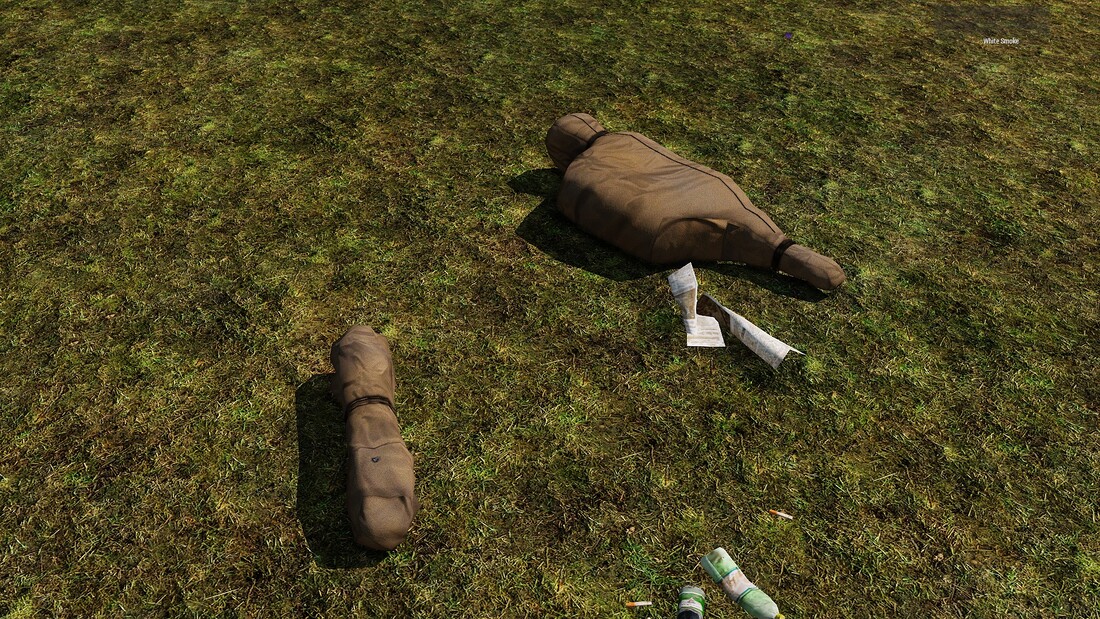
To set up an artillery piece, you must the correct artillery piece(s) itself within your presence. In this example, the M252 Mortar will be used. Each mortar will be divided into two pieces, a tripod and the gun itself. In order to assemble a mortar, you must have one piece on the ground and one piece on your backback. Select the action: Assemble M252 Mortar.
Step One:
Pick up one of the pieces.
Pick up one of the pieces.
Step Two:
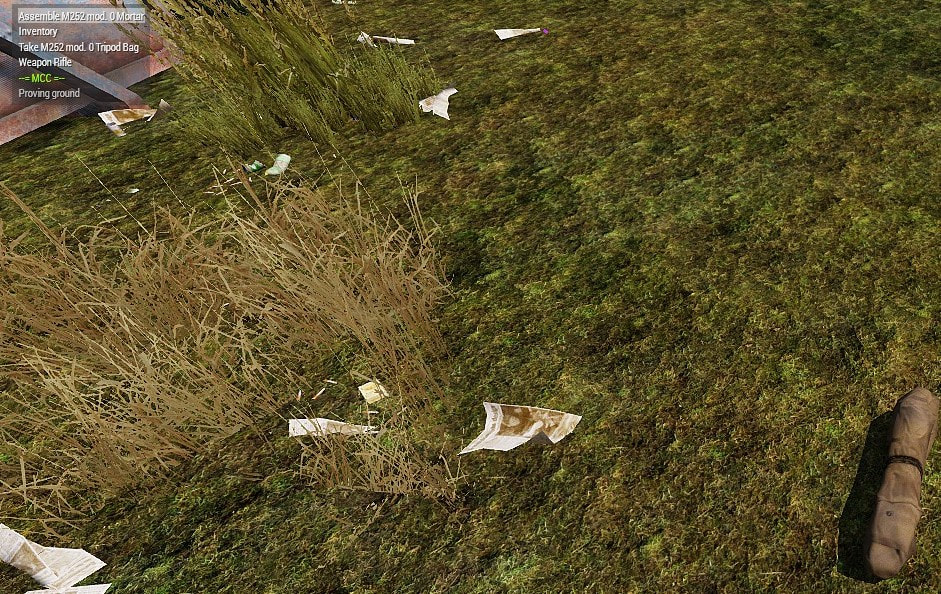
While one pack is on your back, look at the other pack and select the assemble action.
While one pack is on your back, look at the other pack and select the assemble action.
Step Three:
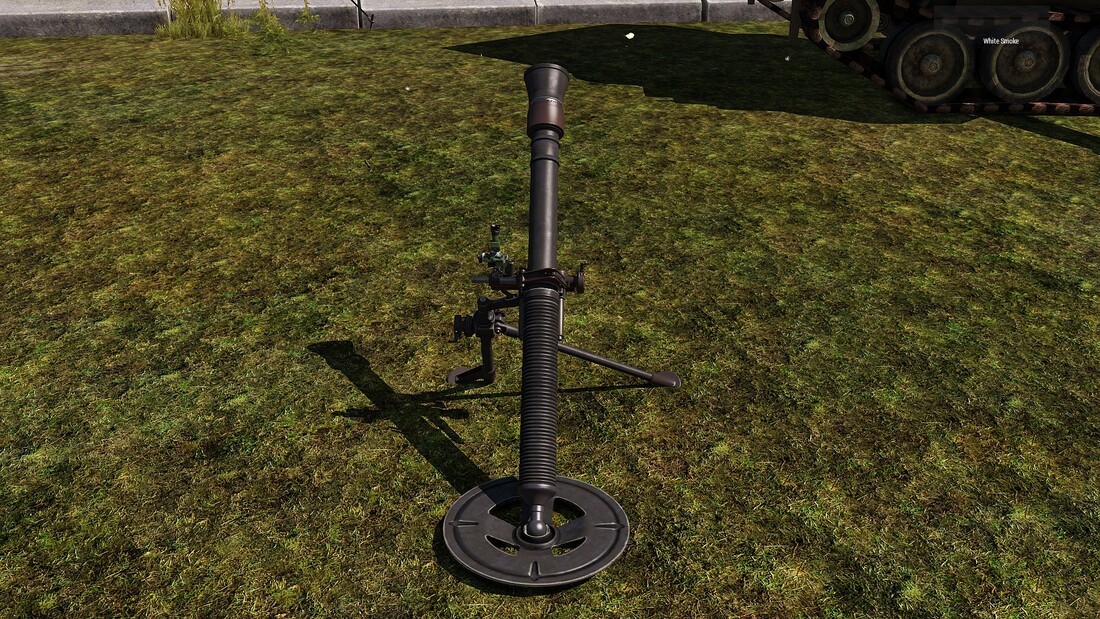
The mortar will be assembled facing the direction you were facing when you selected the assemble action.
Note: You can use the ACE interaction menu to drag, carry, load and disassemble the mortar piece itself.
The mortar will be assembled facing the direction you were facing when you selected the assemble action.
Note: You can use the ACE interaction menu to drag, carry, load and disassemble the mortar piece itself.
Step Four:
To tear down the mortar make sure you are out of it and select the action: Disassemble M252 Mortar
Note: You can dissasemble via ACE3 interaction menu, which will change the mortar pieces to fit into the launcher slots in your inventory.
To tear down the mortar make sure you are out of it and select the action: Disassemble M252 Mortar
Note: You can dissasemble via ACE3 interaction menu, which will change the mortar pieces to fit into the launcher slots in your inventory.
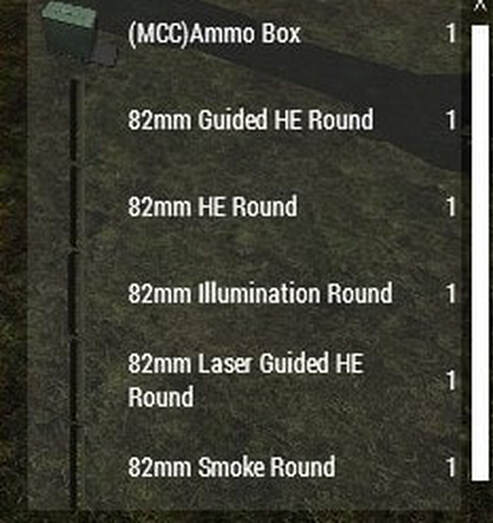
Make sure to have mortar ammunition in your inventory so you can load the mortar later. This can be accomplished via selecting the appropriate rounds in your inventory or using the MCC Ammo Box (if applicable), which provides a universal ammo box to rearm any weapon system available.
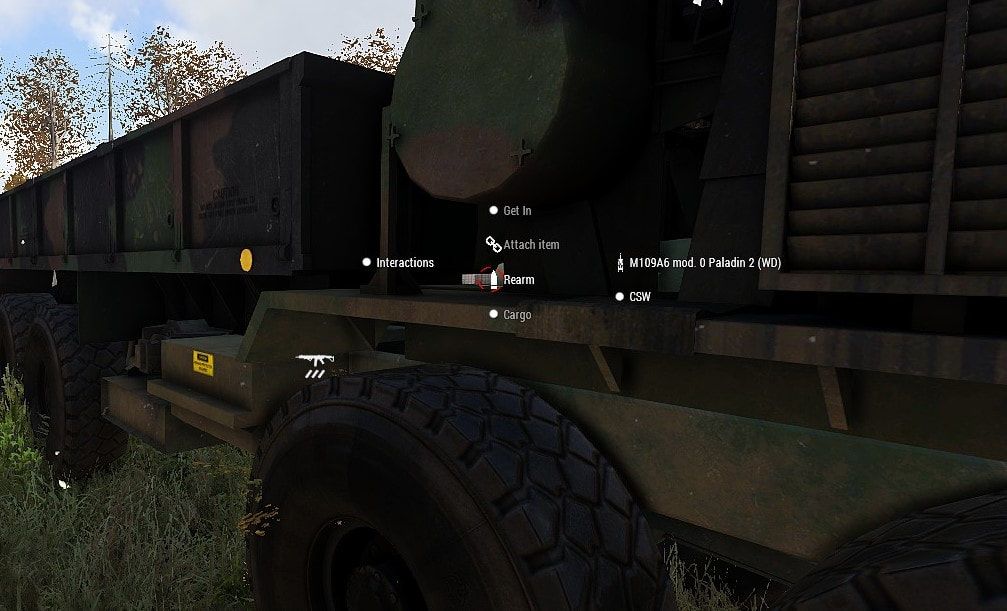
Note: Some artillery pieces, such as the M109 Paladin, cannot be loaded via ammunition from the inventory. They must either be reloaded via external means such as an MCC Ammo Box, Ammunition Vehicle or Depot.
Usage
There are two primary ways an indirect fire weapon system can be utilized. The first and easiest method can be done via ITC Land System's Artillery system, which only supported weapons can use. The second is via traditional ranging and aiming using the range card, which can be used universally.
Calculating Firing Data
In order to aim and fire an artillery piece correctly in an indirect role, you must produce firing data. Firing data can be broken down into two categories: map data, and gun data. Map data pertains to general positional information determined through the use of the map while gun data pertains to a particular weapon system such as the M252 mortar. A target is required to calculate firing data.
Map Data
Step One:
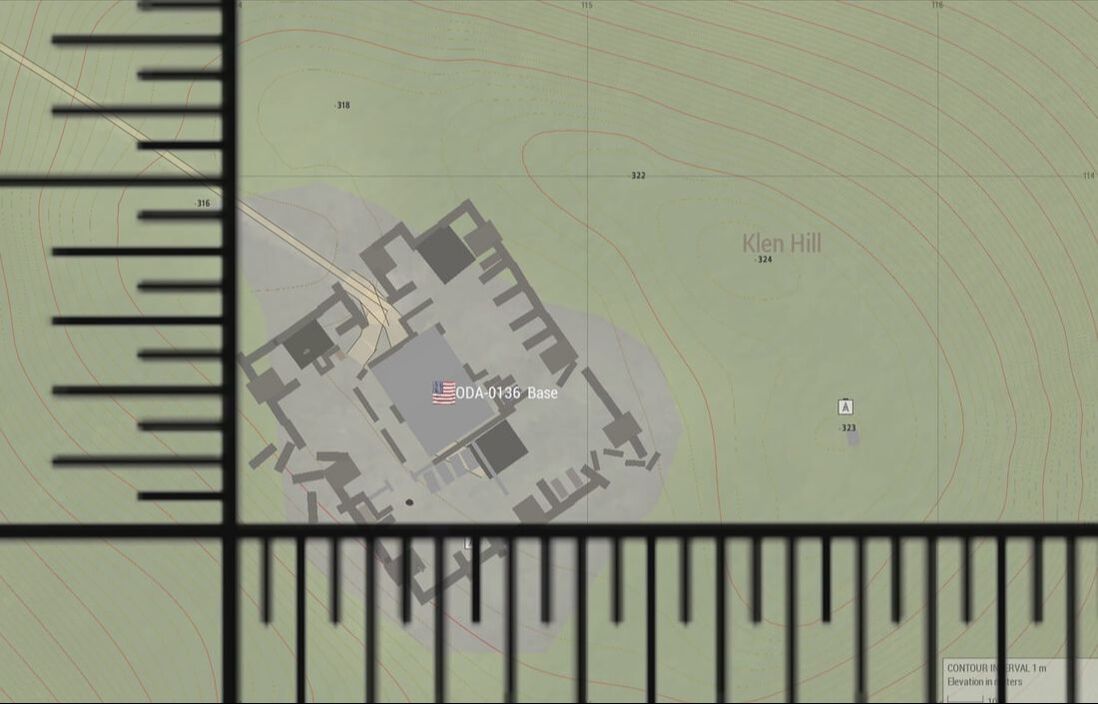
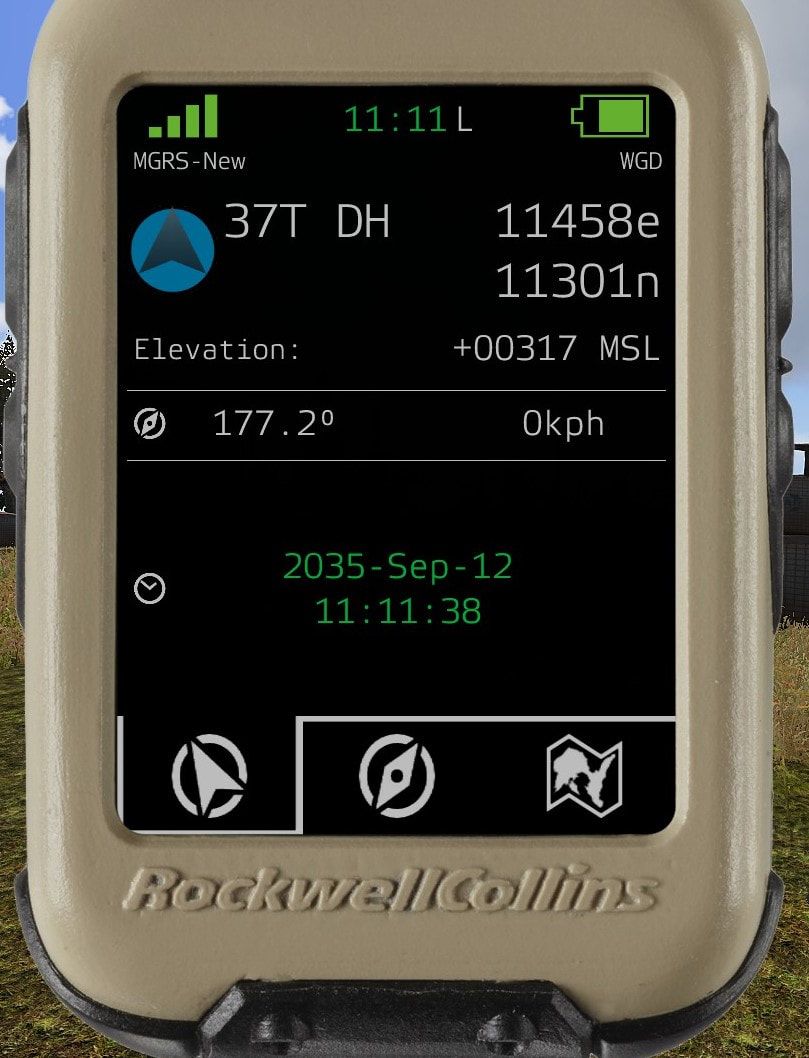
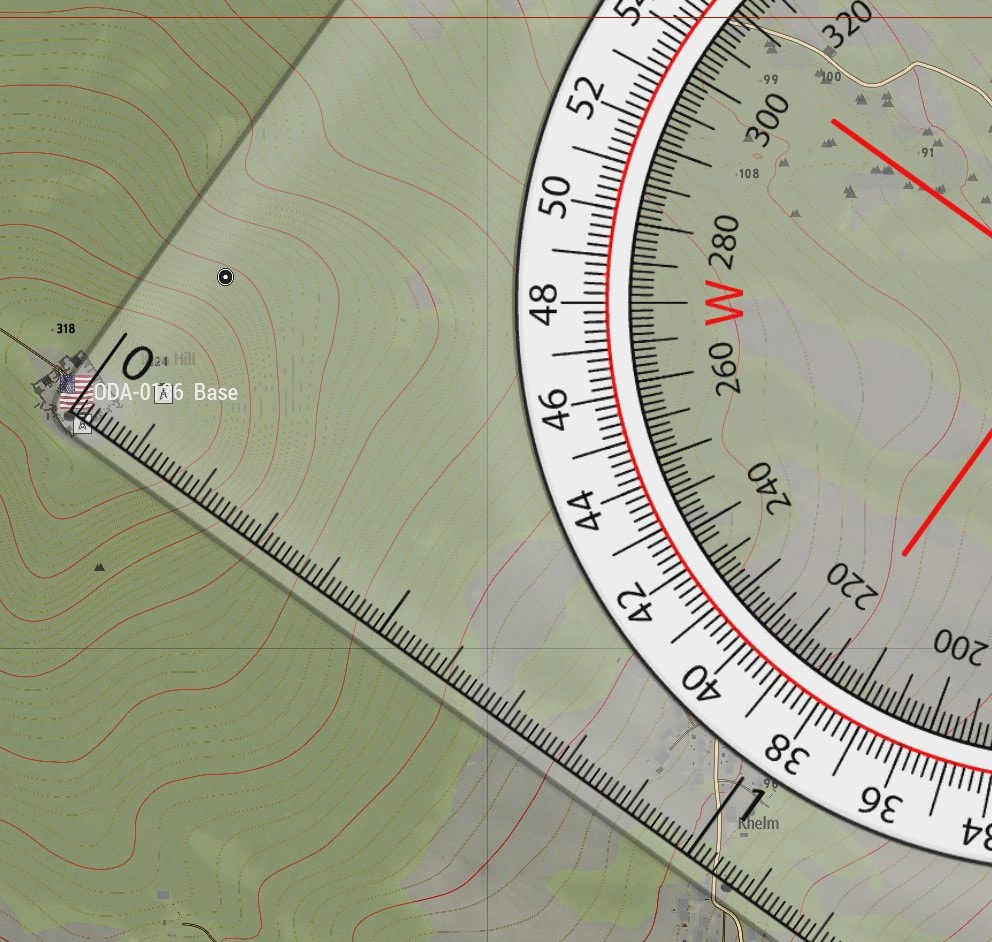
Determine the grid and altitude of the artillery piece and plot the location on the map. This can be done via three ways; using a map and map tools, using the MicroDAGR or using the Commander's Tablet. It is recommended to use the MicroDAGR or the Commander's Tablet whenever feasible.
Map + Map Tools
MicroDAGR
Commander's Tablet

As noted, our grid is: 11458 11301, Altitude 317m
Step Two:
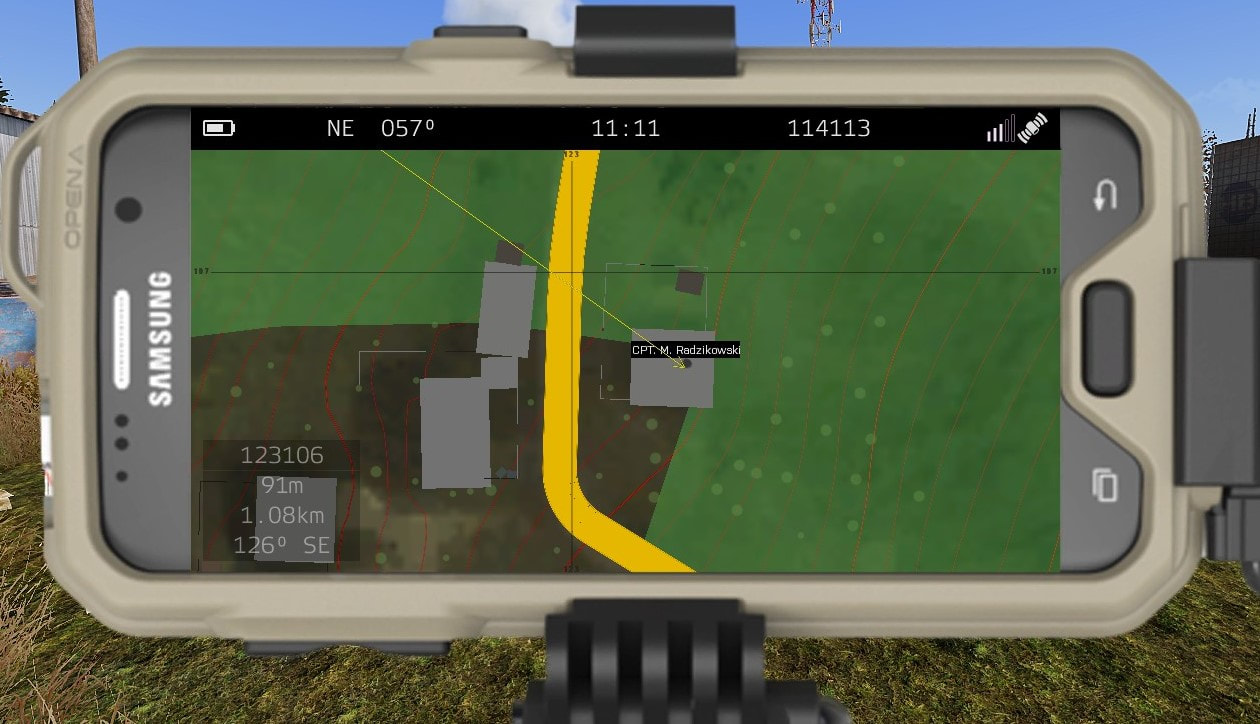
Determine the grid and altitude of the target and plot the location on the map. The two ways this can be done is via Commander's Tablet and the Map & Map Tools. The Commander's Tablet should be utilized to give an initial assessment of the target area and altitude, and the map tools should be used to get a more accurate grid of the target. Getting target data can also be done via secondary means such as a drone or other device that allows to get accurate target data.
Commander's Tablet
Map + Map Tools
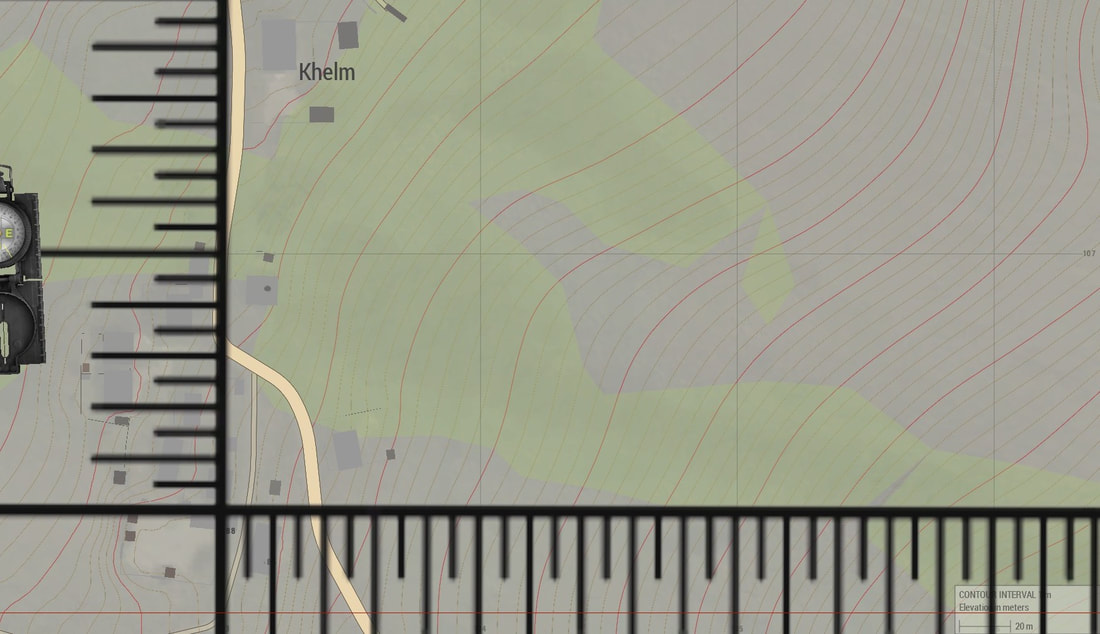
As noted, the target grid is: 1232 1069, Altitude 91m
Note: If you're using the traditional rangetable method, you must determine the altitude difference between the artillery piece and the target.
Add or subtract the target altitude from the mortar altitude whether it’s above or below the artillery altitude. You must be aware of the target altitudes difference to the artillery piece because it affects the accuracy. This primarily applies to mortar systems.
310 - 91 = 226m, Alt Diff: -226m (target is below)
Step Three:
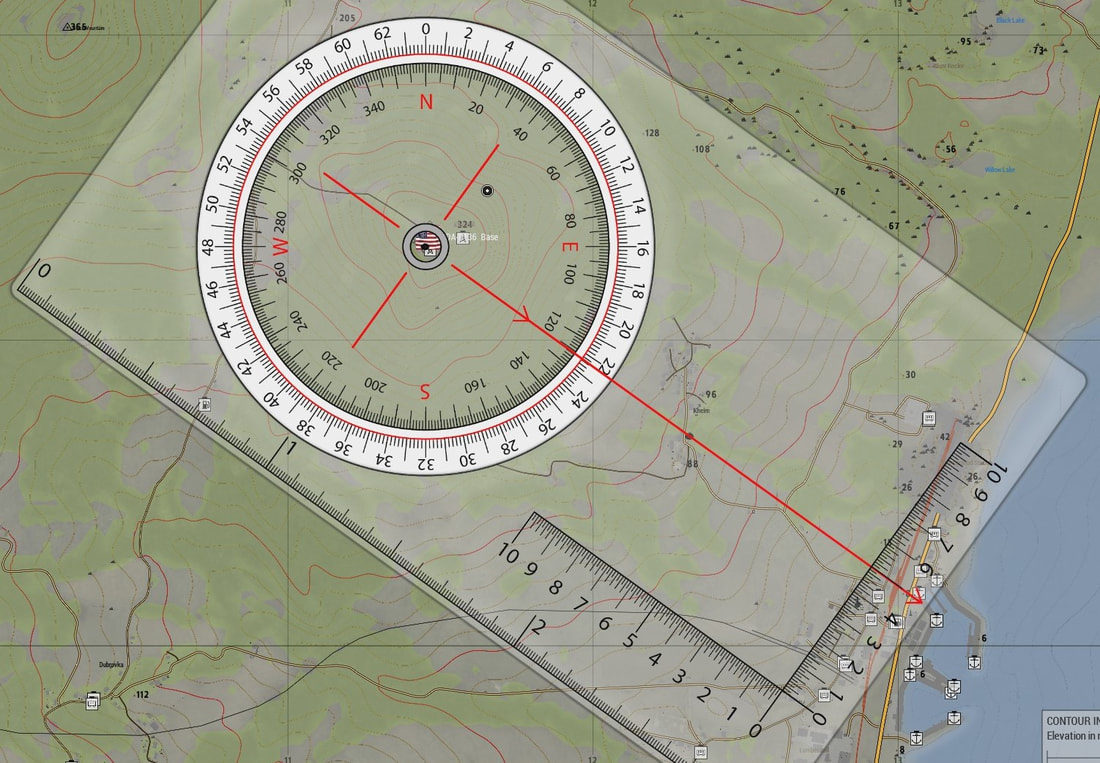
Determine the direction in mils and distance in meters to the target. This is done via combination of map tools and commander's tablet in order to get an accurate assessment.
Map + Map Tools
Commander's Tablet
Direction 2238, Distance 1080m
Once you have determined these things, you have produced enough map data which can be used to produce gun data for your weapon system to lay onto target.
Grid: 1232 10609
Altitude: 91
Direction: 2238
Distance: 1080m
Alt Diff: -226
Once you have determined these things, you have produced enough map data which can be used to produce gun data for your weapon system to lay onto target.
Grid: 1232 10609
Altitude: 91
Direction: 2238
Distance: 1080m
Alt Diff: -226
Gun Data
Now that all the necessary map information is established, gun data can now be registered in order to actually fire. This method is done via ITC FDC Tablet and supported weapon system or through traditional artillery rangetable. The ITC method will be addressed first, followed by the traditional method.
Fire Direction Tablet
Step One
Open the Fire Direction Tablet via ACE Self-Interaction in the Equipment section.
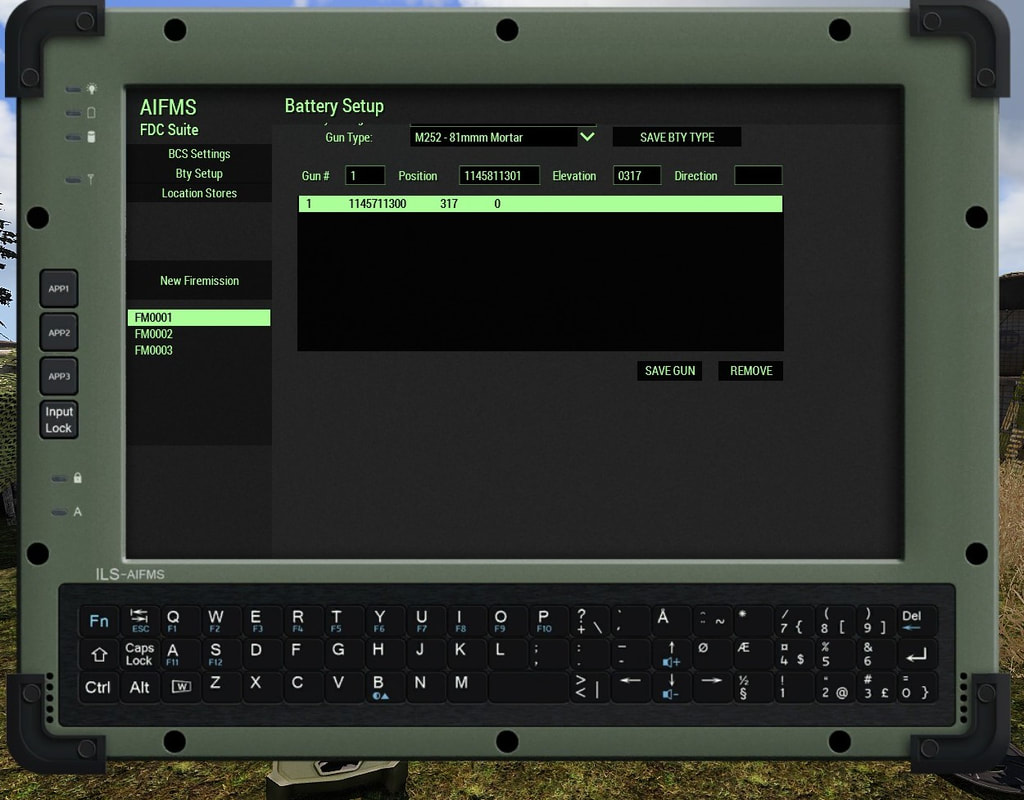
Once opened, tab over and click on 'Bty Setup'.
Once at the setup, you must plug in your grid, elevation and gun type data into the tablet and then save the gun and battery type. It is recommended you use the MicroDAGR to accurately calculate your position and elevation. This should typically be accomplished before gathering any target data.
Understand that this system will only work on artillery systems that are supported. Any ITC-supported artillery system will have it's original name and then "Mod 0" at the end or within the name.
Step Two
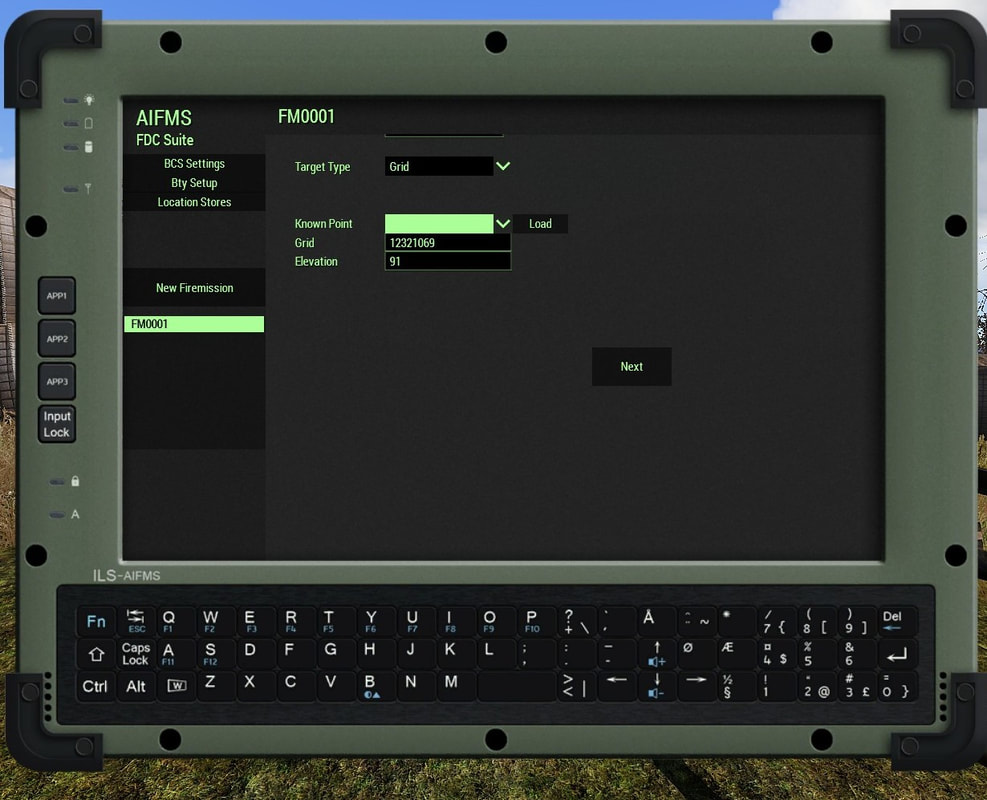
On the tablet, click on the 'New Firemission' tab
The proceed to put in the target type, known point (if any), the grid and elevation data. Once finished, click next and move onto the next step.
Note: Different target types other than Grid are very rarely used. A rule of thumb is to stick to 'Grid' as it is the most definitive and accurate system.
The proceed to put in the target type, known point (if any), the grid and elevation data. Once finished, click next and move onto the next step.
Note: Different target types other than Grid are very rarely used. A rule of thumb is to stick to 'Grid' as it is the most definitive and accurate system.
Step Three
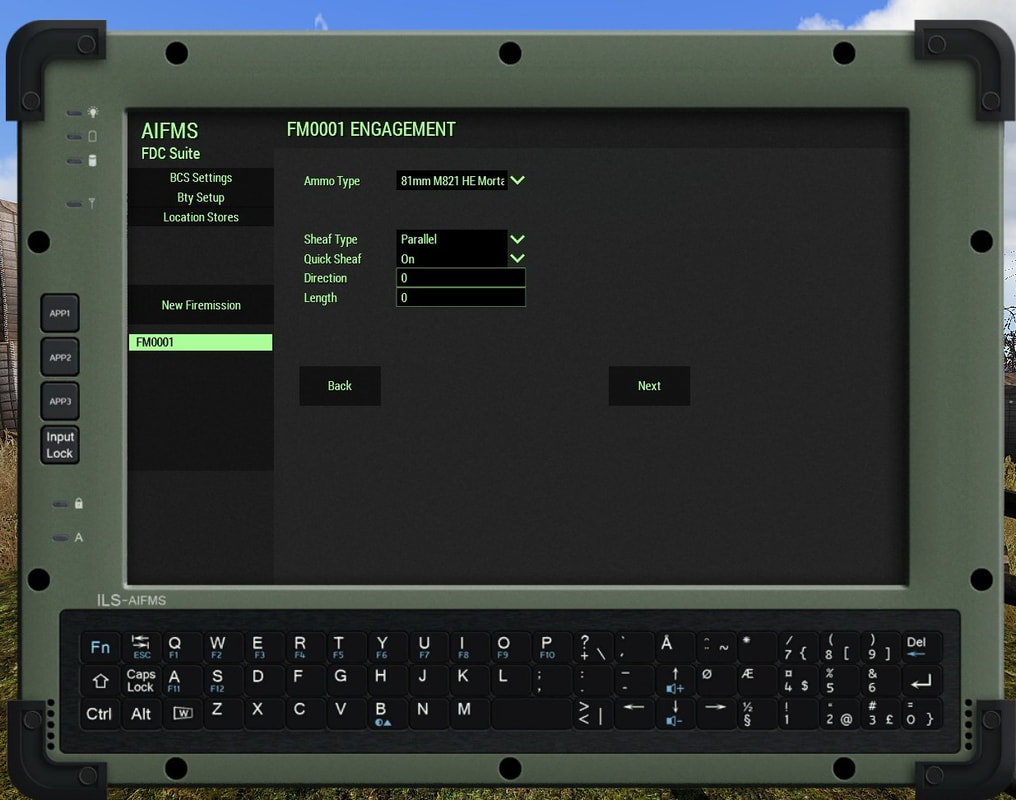
One you have clicked next, select your Sheaf Type and remaining Sheaf data and then move onto the next step.
Sheafs are areas or boxes, known as that artillery falls in, also known as the 'beaten zone'. Their long axis is along the line of fire, meaning that they generally form a line perpendicular to the direction of fire. They can converge and concentrate fire or fire into adjacent boxes diluting their fire.
Note: This is generally not a necessity and only used for very specific calls for fire. The rule of thumb is to leave as is.
Step Four
At the last section, the tablet will display a firing solution for your supported artillery piece. Simply note down the firing solution on a notepad and move on to using the supported artillery piece.

Step Five
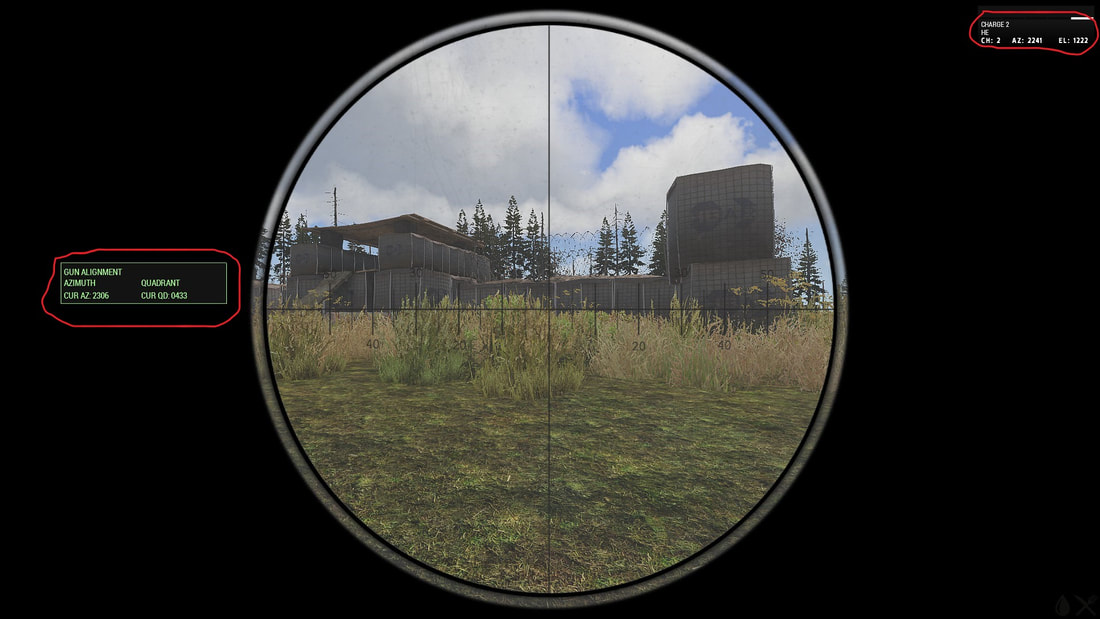
Once you're on your supported weapon system (which can be verified by the information in green text displayed on the left screen), use your ranging key (default is: 'Page Up' / 'Page Down') and mouse to adjust the azimuth and elevation of your weapon system to the prescribed solution. The solution should be adjusted on the green display screen on the left. The main difference to be aware of is that Quadrant means Elevation.
Note: Some supported artillery pieces, such as the ITC-supported M252 mortar, does not actually utilize the solution data on the left hand side and instead the top-right information display must be used instead when plugging in the tablet data. In some cases, azimuth must be calculated via green display and elevation must be calculated via top-right white display.
This varies by artillery piece and must be accounted for beforehand. If an artillery system does not have the green information display on the left, do not use the tablet information and instead utilize the vanilla or MCC artillery computer or the traditional ranging table method.
Step Six
Make sure your artillery piece is loaded with the correct round, account for the wind (if using air resistance) and be ready to fire. Verify that the ammunition, charge, direction, and elevation values have not accidently changed while applying settings.
Note: In order to account for the wind, you can use a Kestrel 4500NV and determine the exact windspeed and adjust your azimuth/elevation based on how much the wind speed is at by meters. Remember that the lighter the round, the more it will be affected by the wind. Because ITC mainly accounts for this, it is not always necessary, however, in certain cases, wind can severely affect the placement of the rounds
The general rule of thumb for wind direction:
Towards you = Rounds will drift back
Behind you = Rounds will drift forward
At an angle or to the side = Rounds will drift to left or right
The artillery piece is now laid onto the target and ready to fire.
Range Table
Step One
Open the range tables by selecting: Self interact > Equipment > (Artillery Piece Name) Rangetable.
Select the charge increment that covers the distance to the target. The ranges are listed in the range column for the various distances. Charges allow the projectile to move greater distances and increase the time of flight.
Select the charge increment that covers the distance to the target. The ranges are listed in the range column for the various distances. Charges allow the projectile to move greater distances and increase the time of flight.
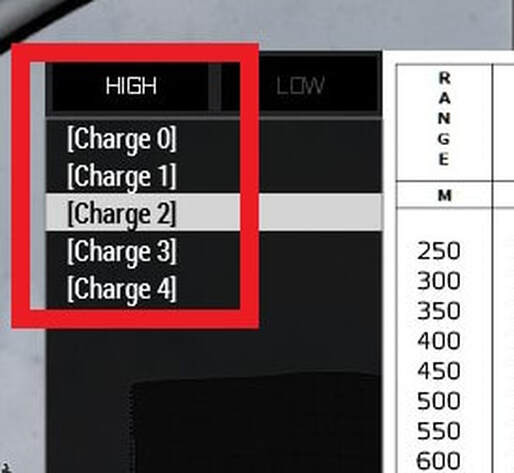
Charge 2
Step Two
In the elevation column, find the elevation that corresponds to your distance in the range column. This is the base elevation for that range. If the altitude difference is less than 100m then you don't need to calculate the next two steps. Use this number as your calculated elevation.
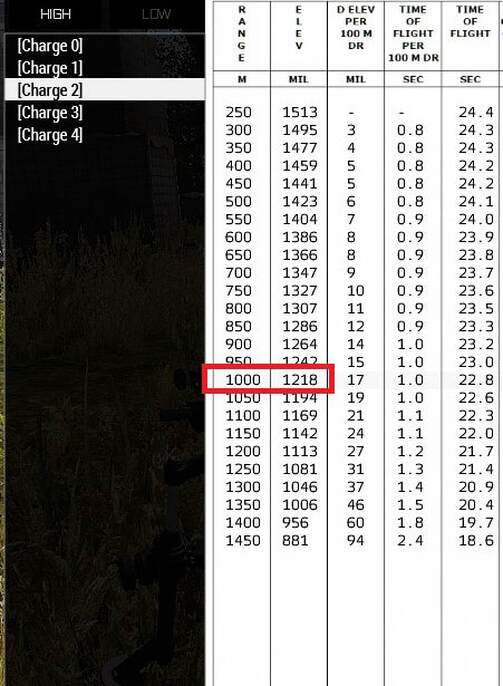
Elevation 1218
Step Three
Elevation Difference
Find the elevation difference value under 'D Elev per 100m DR' column.
Find the elevation difference value under 'D Elev per 100m DR' column.
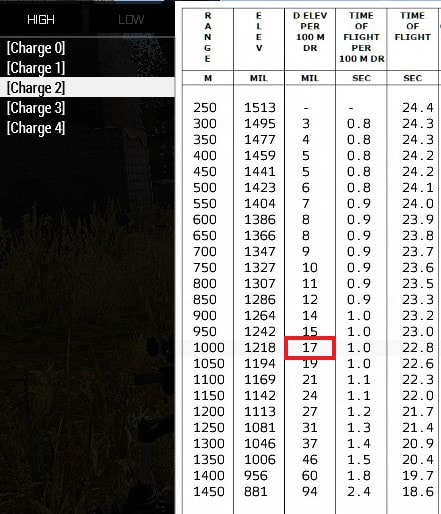
D Elev per 100m DR 17
Now you must calculate the elevation by using the base elevation number and elevation difference per 100 meters number.
If you’re 200m above your target, multiply the number by 2 and add it to your ELEV.
If you’re 200m below the target, multiply the number by 2 and substract it to your ELEV.
The higher the elevation the closer to you it will land.
17 x 2 = 34
1218 + 34 = 1252
Elevation 1252
Map data and gun data has been determined resulting in firing data being produced in the form of ammunition, charge, direction, and elevation.
HE, Charge 2, Direction 2241, Elevation 1252
Note: Firing data from an ITC-system and from the ACE3 Ranging Table will vary
HE, Charge 2, Direction 2241, Elevation 1252
Note: Firing data from an ITC-system and from the ACE3 Ranging Table will vary
Alternative Method
For a distance that's between two of the distances in the range table, interpolate between the two given distances. I.e. if your distance is 1120 meters, take the elevations for ranges 1100 and 1150, calculate the difference, divide that difference by 5 (for 50 meters between the ranges on the table), multiply by 2 (for the 20 we need) and subtract (!) it from the elevation for 1100. Note: To shoot FURTHER, you aim LOWER (with a lower angle). To shoot SHORTER, you aim HIGHER. It's a bit counter intuitive, but that's how indirect fire works.
Also in the range table you find the adjustments you have to make for a difference in altitude between mortar and target. The number given is per 100m difference. Calculate the difference between the altitude of your mortar and the target's altitude and divide by 100, then multiply by the number given in the third column of the range table, of the line that corresponds with your range. If your mortar is higher than your target ADD this number to the elevation you got in step 5, if your mortar is below your target, SUBTRACT it.
Also in the range table you find the adjustments you have to make for a difference in altitude between mortar and target. The number given is per 100m difference. Calculate the difference between the altitude of your mortar and the target's altitude and divide by 100, then multiply by the number given in the third column of the range table, of the line that corresponds with your range. If your mortar is higher than your target ADD this number to the elevation you got in step 5, if your mortar is below your target, SUBTRACT it.
Loading the Round
Once the fire mission is requested and the necessary rounds on target are known, you then must determine the ammunition type to be fired. For mortars, this is based on the type of rounds available to the team and can include; HE, Smoke, Illumination, etc. Each round is individually loaded via the ACE Interaction on the muzzle end or the center of the tube itself.
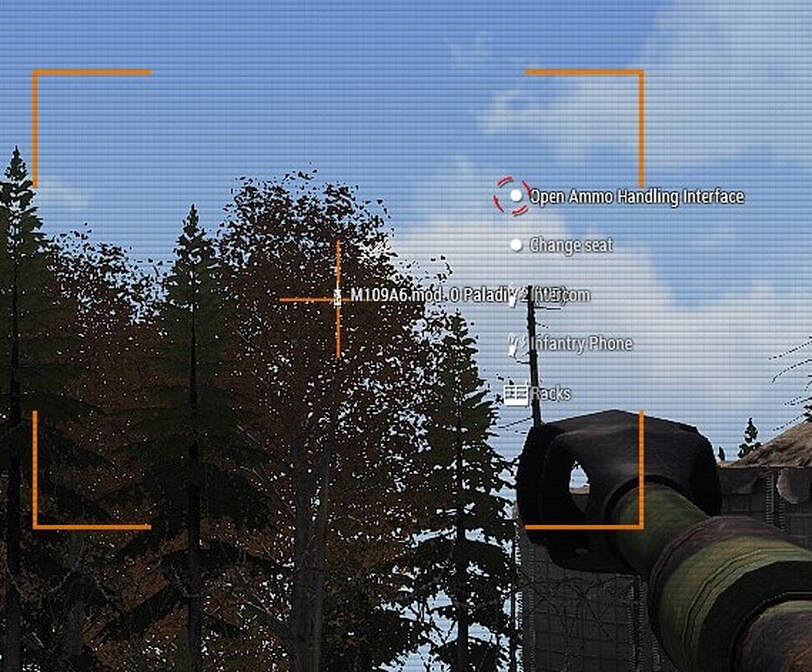
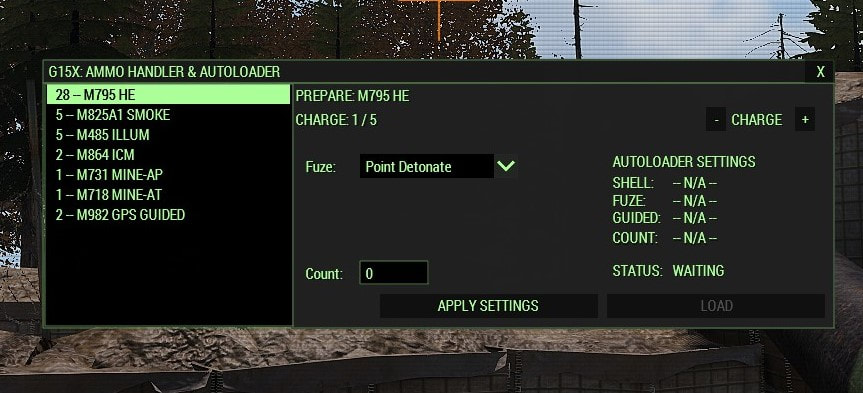
For heavier artillery such as the M109 Paladin, reloading is handled via autoloader, meaning that each round will be loaded automatically within a span of several seconds without any player interaction needed. Rounds can be changed via scroll wheel interaction. For ITC-supported heavier artillery, reloading is typically done via using ACE Interaction menu to open the ammo handling interface.
For heavier artillery such as the M109 Paladin, reloading is handled via autoloader, meaning that each round will be loaded automatically within a span of several seconds without any player interaction needed. Rounds can be changed via scroll wheel interaction. For ITC-supported heavier artillery, reloading is typically done via using ACE Interaction menu to open the ammo handling interface.
Considerations
• If you wish to make the rounds drop further decrease elevation.
• If you wish to make the rounds drop closer increase elevation.
• If the direction is not correct to the target it will increase in error over a larger distance.
• Keep the charge increment consistent throughout your firing on a single target.
• Difference in altitude affects the trajectory and must be taken into account for accuracy.
• Linear interpolation of the range tables for specific distances not listed will allow for more precise elevations.
• Deploy the mortar on an altitude that will closely match the target altitudes to reduce calculations required.
• Keep track of ammunition remaining.
• When adjusting figure out the correction that needs to be made by recalculating map and gun data for the new location in relation to the old location. example: Northeast 150m
Operating in an Artillery Crew
Operating a crew served weapon requires teamwork and coordination. All members of the team should understand their role and what is required to complete various task. An indirect fire team can be broken down into, at minimum, two key tasks, gunner and assistant.
Gunners are the senior members of the team. They are responsible for selecting a position for the gun, communicating with the supported group, referencing all fires data on the gun, and supervising the operation of the gun.
Assistants are typically the fire coordinators, they are responsible for producing all necessary map and firing day. They will typically run down all requests and fire missions to the gunner. They may also be employed to carry ammunition and equipment as well as act as security or relief to the crew.
In an ideal situation, a crew should have four members. A gunner, assistant, designated ammo man and a designated fires coordinator. That said, in a worst case scenario, artillery pieces can be operated by a single person if absolutely necessary, at the cost of a much slower response time.
Orders should be given clearly and consistently. Information should be double checked and acknowledged. Fire discipline is important for communication within the team and effectiveness in support of other groups. Common prowords and formats should be understood and applied.
Common prowords include the following:
• Grid
• Altitude
• Direction
• Distance
• Ammunition
• Charge
• Elevation
• Fire Mission
• Adjust Fire
• Fire For Effect
• # Rounds
• At My Command
• Shot
• Rounds Complete
• Check Firing
• End of Mission.
A consistent orders format should be used when issuing orders to the artillery team. Orders should be given in a packet and acknowledged, read back, or repeated after they have been initially given. It is suggested to use the following orders format or develop or use another format and brief the team once in game.
Fire Orders Example
Warning Order (Alert) - Fire Mission #1
Method of Fire (# of rounds) 5 Rounds
At my Command (Fire Control) At my command!
Ammunition (Projectile, Charge) HE, Charge 2
Direction Direction 2241
Elevation Elevation 1252
The convention for firing is to fire the number of rounds ordered once the gun is ready unless 'At my command' has been ordered. 'At my command' must be acknowledged by the gunner and the Fire order given by the assistant.
'Rounds complete' should be reported by the assistant once the method of fire is concluded.
The assistant should always verify that the gunner has inputted the firing data correctly by getting in the weapon and doing a double check prior to firing the first round in a fire mission.
To remember the orders format, use a mnemonic such as: Will My Artillery Destroy Everyone?
