Getting lost is actually easily preventable, however this requires the know-how on staying on track. And with bullets whizzing by, this can become increasingly more difficult. Here are some basic steps to minimize your chances of getting lost.
• If feasible, get a map of the area in which you will be travelling through, and study it before you move.
• Use the map and a compass or GPS while you're there, constantly staying aware of your position.
• Keep a map in your mind, too. Imagine what the terrain would look like from a bird's-eye view and visualize your place in that terrain. Think of that little "You Are Here" arrow on the big map at a trailhead, and keep it updated in your mind.
• Take note of prominent topographical features and keep them in view as much as possible.
• Look back frequently and remember the landmarks behind you, especially if you'll be returning in that direction.
• When venturing off the trails, use a compass or distant features like mountains or canyons to help you travel in straight lines.
• Always make sure your team and your higher command elements know where you're going and when you're supposed to be coming back
Basics
- Open the map by pressing [M].
- Zoom the map in or out with [mouse-wheel up and down].
- Try hiding or showing map textures or centering on your position. Buttons are located on the top toolbar.
- Close the map by pressing [M] or [Esc].
How Arma Maps Work
The map used in ARMA 3 is a variable scale, topographic map using a simplified MGRS (Military Grid Reference System). Compared to real life maps, the ARMA map differs in a few ways, primarily:
- No difference between magnetic North and true North.
- No magnetic declination to account for.
- No grid zone designator to account for.
- The only marginal information on the ARMA 3 map, is scale and contour line distance.
Elevation & Contour
At certain locations on the map you will see a dot and number, this is the altitude above sea level of that location in meters.
Elevation on the map is represented by contour lines. ARMA uses two types of contour lines:
You can find the ‘contour interval’ in the bottom right margin on the map. The contour interval represents the vertical distance between any two adjacent contour lines at the current map scale. Thus, the closer the contour lines are, the steeper the slope is because more vertical distance is covered in a shorter horizontal distance.
Contour lines never intersect because any point on a contour line is at the same elevation above or below sea level.
Elevation on the map is represented by contour lines. ARMA uses two types of contour lines:
- Index Lines: Starting at sea level, every fifth contour line is considered an Index Line and is shown in red on the map.
- Intermediate Lines: All contour lines between the index lines are considered intermediate lines and are spaced at the current contour interval.
You can find the ‘contour interval’ in the bottom right margin on the map. The contour interval represents the vertical distance between any two adjacent contour lines at the current map scale. Thus, the closer the contour lines are, the steeper the slope is because more vertical distance is covered in a shorter horizontal distance.
Contour lines never intersect because any point on a contour line is at the same elevation above or below sea level.
Symbols
Because it is often not practical to show certain objects at scale on a map, or because more information than just the shape and size of an object is required, symbols are commonly displayed on the map.
Common symbols seen on the map are categorized into two categories, man made objects and natural objects.
Symbols representing man made objects include:
1. Primary Paved Roads(MSR)
2. Paved Roads(ASR)
3. Dirt Roads
4. Foot Paths
5. Town and City Centers
6. Buildings and Walls
7. Prominent Vertical Structures (Antenna, Wind Generator, Lighthouse, etc)
8. Runways and Airports
Symbols representing natural objects include:
1. Contour and Elevation
2. Mountain Peaks
3. Water Features
4. Forested Areas
5. Brush
Identify Terrain Features
Know how to interpret the contour lines to identify terrain features. Terrain features are identified in the same manner on all maps, regardless of the contour interval, but you must realize that a hill in the Rocky Mountains will be much different than one in south Florida. You must be able to recognize all the terrain features to locate a point on the ground or to navigate from one point to another.
The five major terrain features are: Hill, Ridge, Valley, Saddle, and Depression. The three minor terrain features are: Draw, Spur and Cliff.
Terrain features can be learned using the fist or hand to show what each would look like on the ground.
The major and minor terrain features and how they look:
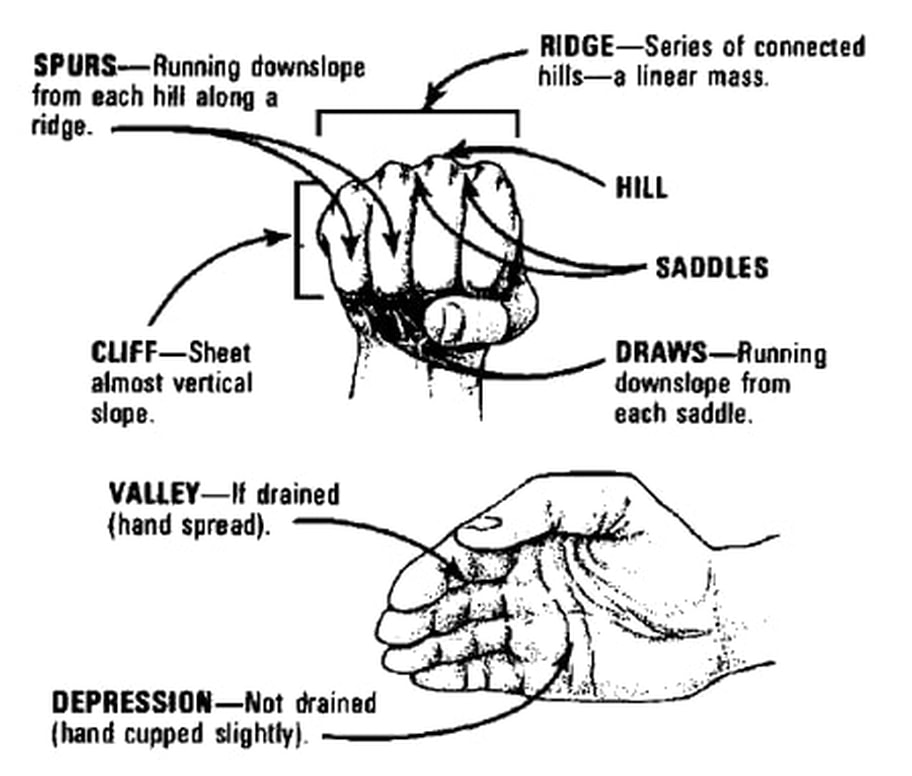
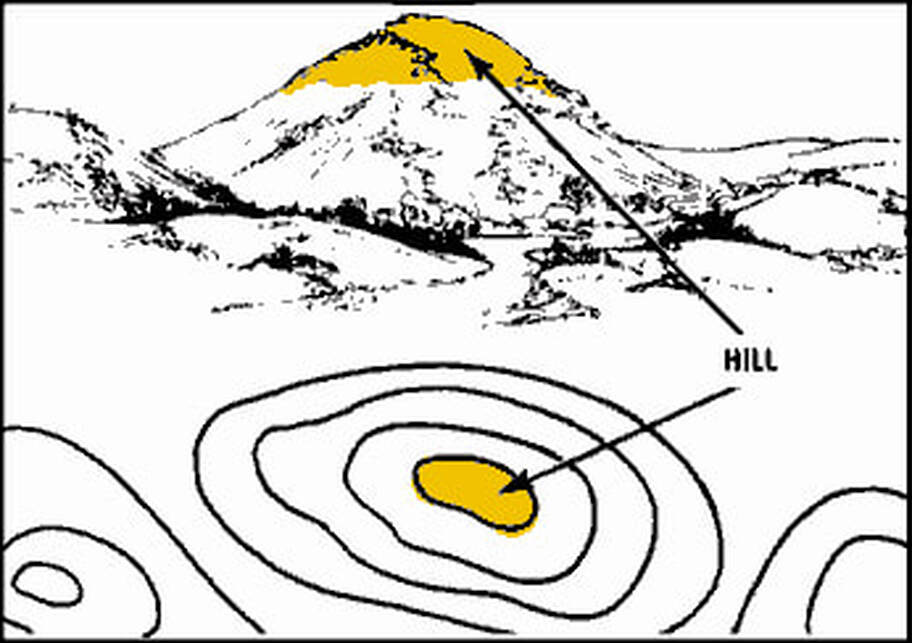
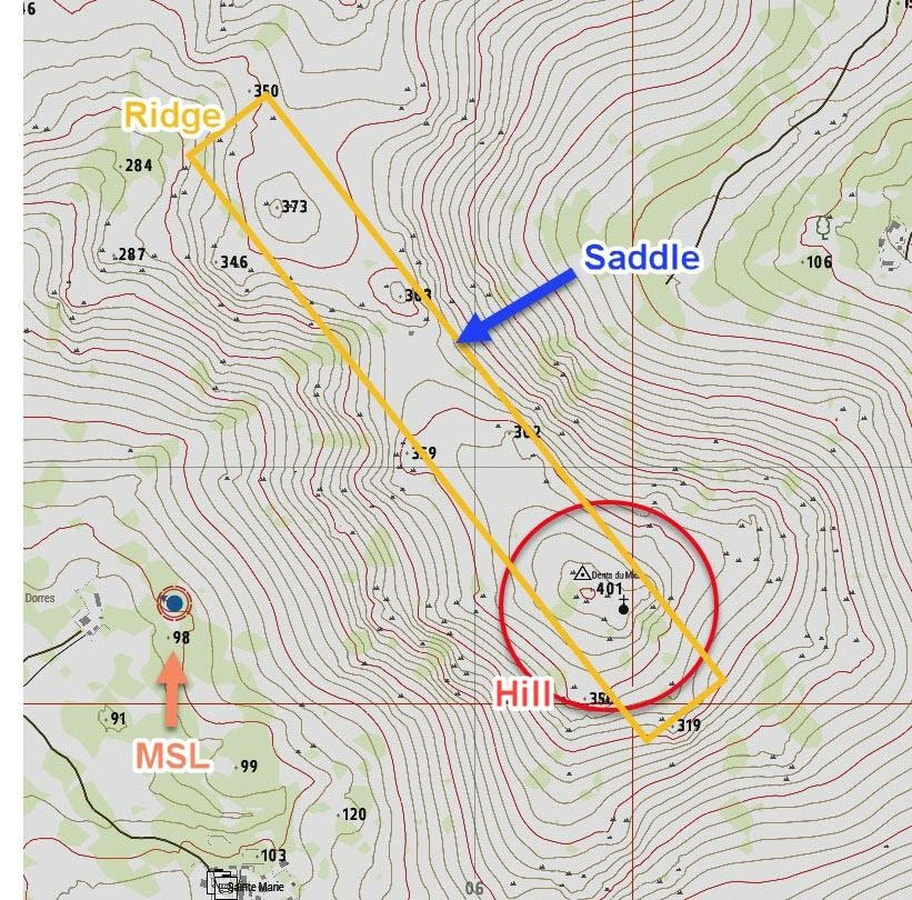
Hill. A point or small area of high ground. When you are on a hilltop, the ground slopes down in all directions.
Ridge. A line of high ground with height variations along its crest. The ridge is not simply a line of hills; all points of the ridge crest are higher than the ground on both sides of the ridge.

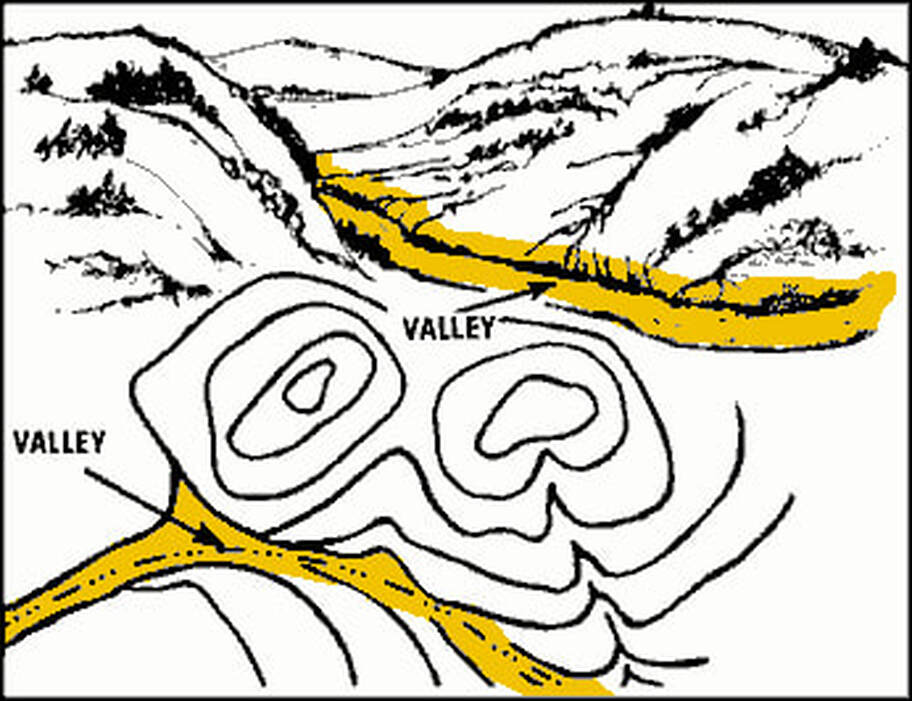
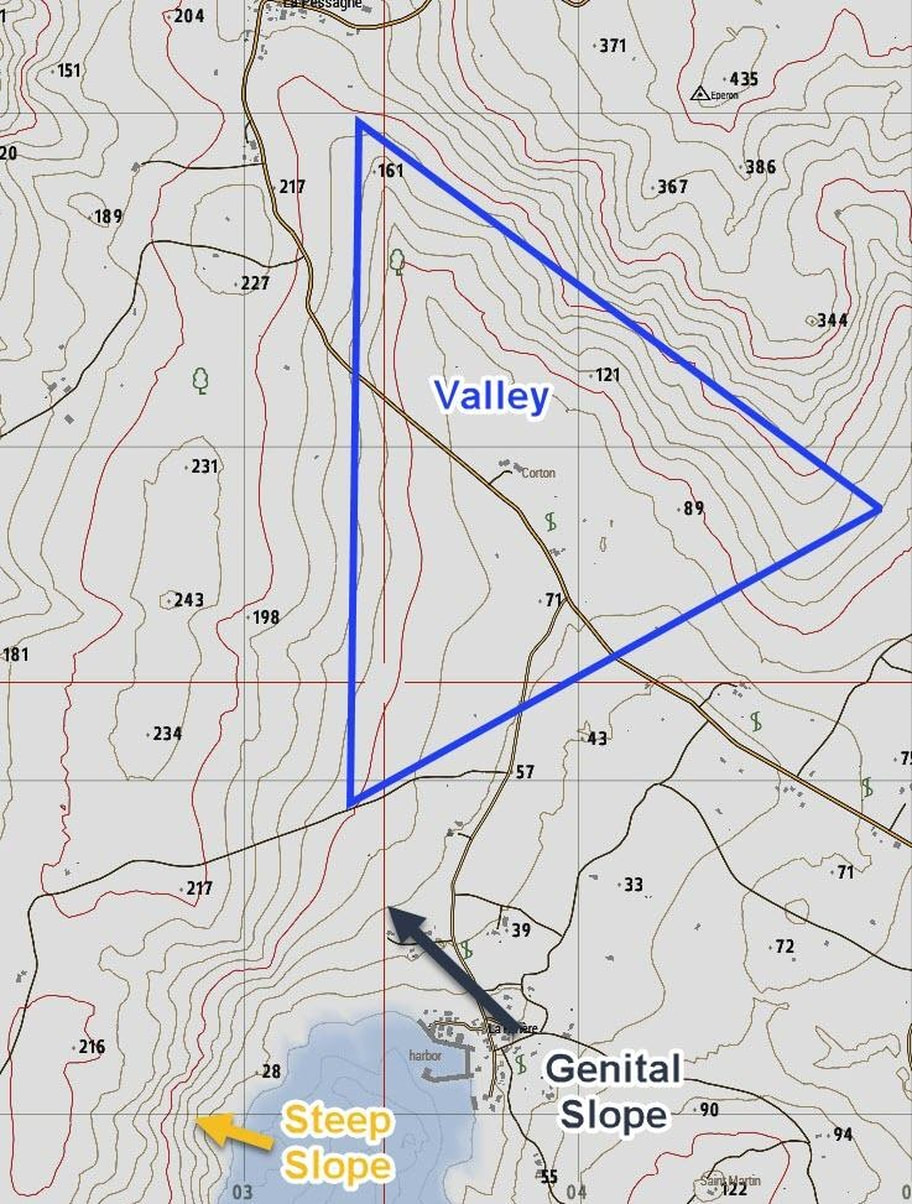
Valley. Reasonably level ground bordered on the sides by higher ground. A valley may or may not contain a stream course. A valley generally has maneuver room within its confines. Contour lines indicating a valley are U-shaped and tend to parallel a stream before crossing it. The course of the contour line crossing the stream always points upstream.
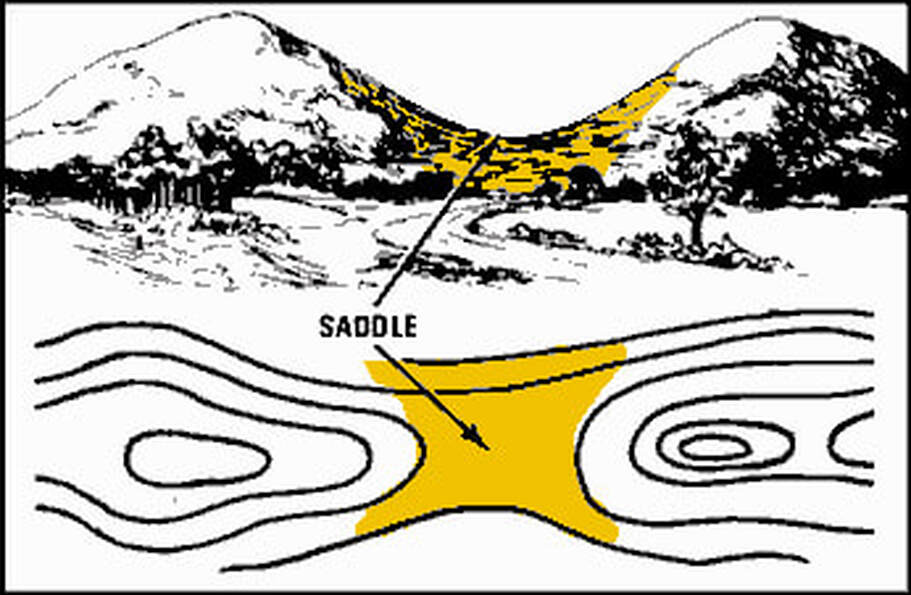
Saddle. A dip or low point along the crest of a ridge. A saddle is not necessarily the lower ground between two hilltops; it may be a break along an otherwise level ridge crest.
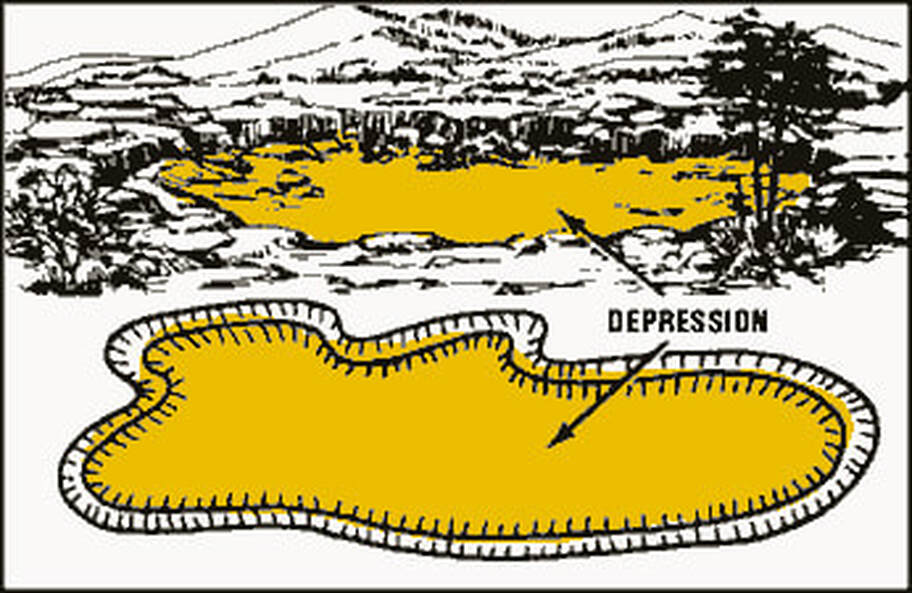
Depression. A low point or hole in the ground, surrounded on all sides by higher ground.
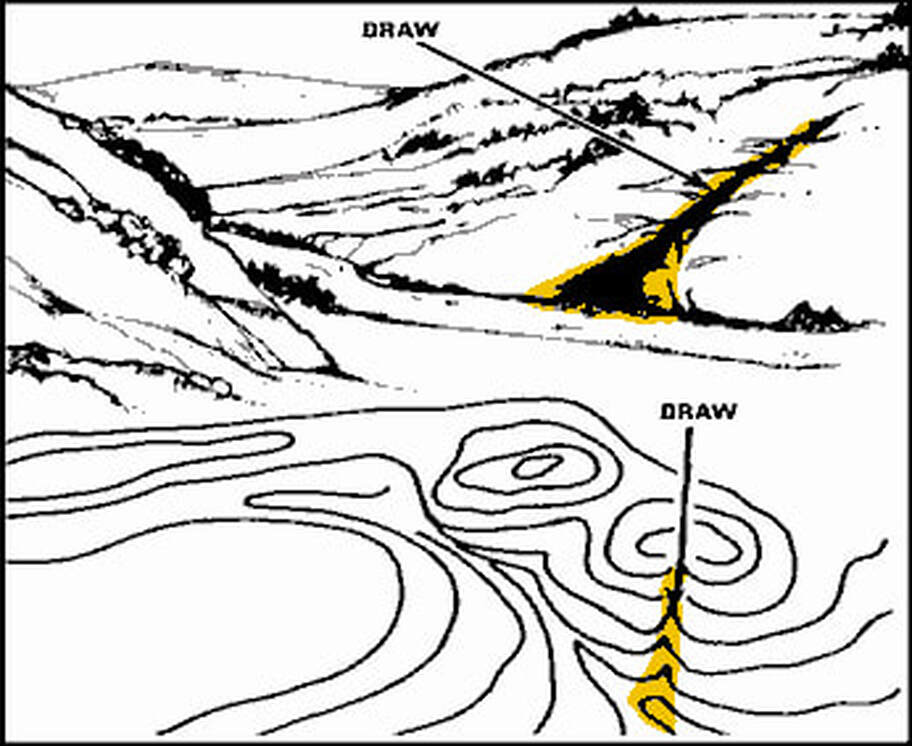
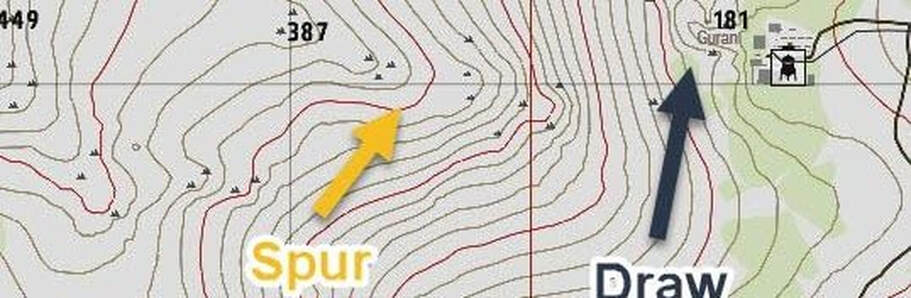
Draw. Similar to a valley, except that it normally is a less developed stream course in which there is generally no level ground and, therefore, little or no maneuver room. The ground slopes upward on each side and toward the head of the draw.
Draws are caused by flash floods and can be found on flat terrain but are more often found along the sides of ridges. Contour lines indicating a draw are shaped like a “V” with the point of the “V” toward the head of the draw (high ground).
Draws are caused by flash floods and can be found on flat terrain but are more often found along the sides of ridges. Contour lines indicating a draw are shaped like a “V” with the point of the “V” toward the head of the draw (high ground).
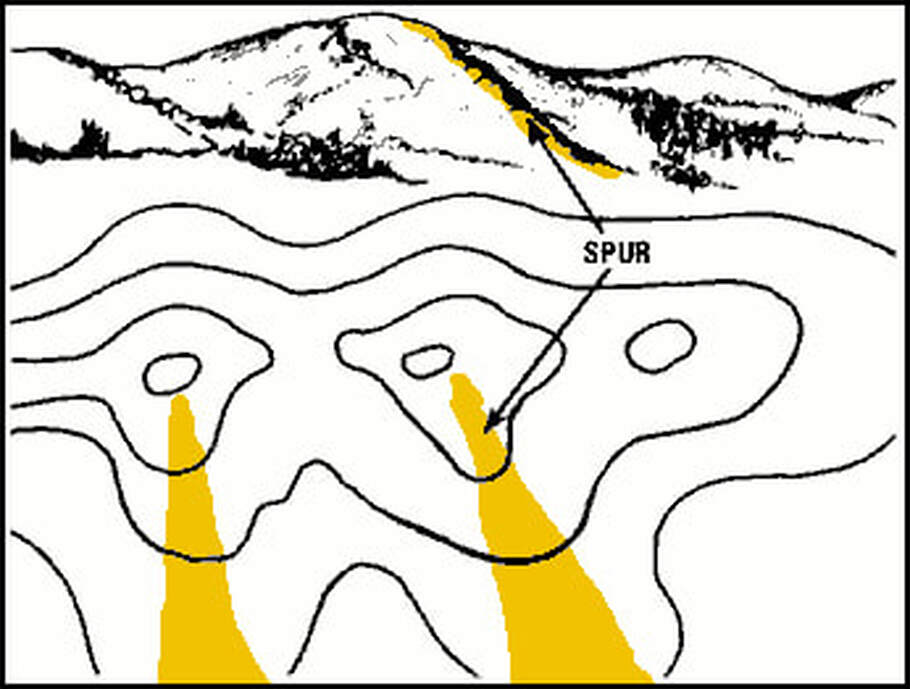
Spur. A usually short, continuously sloping line of higher ground, normally jutting out from the side of a ridge. A spur is often formed by two thoroughly parallel streams cutting draws down the side of a ridge
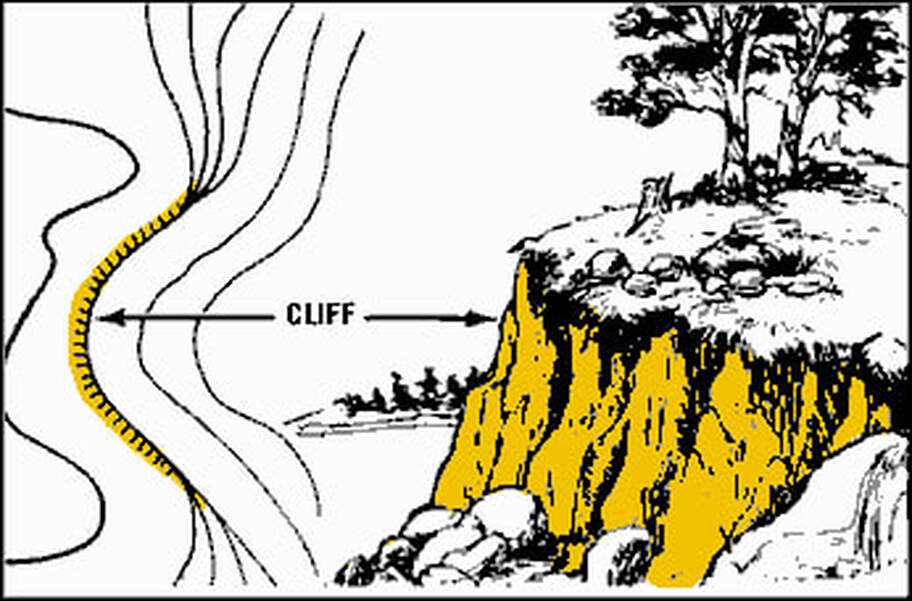
Cliff. A vertical or near-vertical slope. A cliff may be shown on a map by contour lines being close together, touching, or by a ticked “carrying” contour line. The ticks always point toward lower ground.
Grids
Reading a grid reference is essential to locating and communicating positions in the world onto a map.
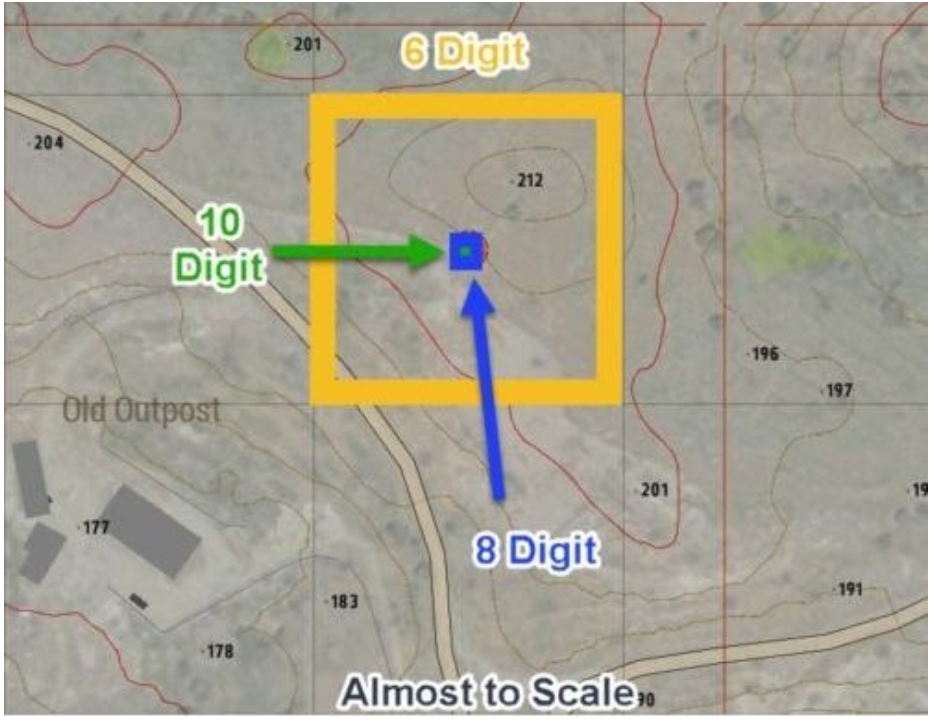
Precision. The map is divided into equally sized grid squares, and intersecting lines are numbered both vertically (Eastings) and horizontally (Northings). Each digit of a grid reference represents one decimal place, starting at 10 km with the two digit grid reference.
Precision. The map is divided into equally sized grid squares, and intersecting lines are numbered both vertically (Eastings) and horizontally (Northings). Each digit of a grid reference represents one decimal place, starting at 10 km with the two digit grid reference.
Four Digit (12 67) = precision level 1 km
Six Digit (123 678) = precision level 100 m
Eight Digit (1234 6789) = precision level 10 m
Ten Digit (12345 67890) = precision level 1 m
Six Digit (123 678) = precision level 100 m
Eight Digit (1234 6789) = precision level 10 m
Ten Digit (12345 67890) = precision level 1 m
Reading a gridIt is easy to read 2, 4, and 6 digit grid references from the ARMA map because the map scales as you zoom in and out, but you can read a more precise grid reference using either map tools or estimation.
Either way, the steps remain the same:
1. Read BOTTOM & TOP first (Vertical numbers)
2. Read LEFT TO RIGHT second (Horizontal numbers)
3. Combine the two readings together to create the grid reference.
Either way, the steps remain the same:
1. Read BOTTOM & TOP first (Vertical numbers)
2. Read LEFT TO RIGHT second (Horizontal numbers)
3. Combine the two readings together to create the grid reference.
ACE Map Tools
To use map tools, the Map Tools item is required.
The Map Tool usually appears somewhere in the lower left corner of your Map and you may have to zoom out to get it. Just pressing on it with the left mouse button is enough to move it around. To actually turn it around, which you will need to do you need to press “CTRL + Hold Left Mouse Button” and then align it north
- Open the map M (Arma 3 default key bind Map).
- Press the Self Interaction key Ctrl + ⊞ Win (ACE3 default key bind Self Interaction Key).
- Select Map tools.
- Select the type of tools you want to use.
- Note that you can drag the Roamer (map tool) around with LMB and rotate it with Ctrl + LMB.
The Map Tool usually appears somewhere in the lower left corner of your Map and you may have to zoom out to get it. Just pressing on it with the left mouse button is enough to move it around. To actually turn it around, which you will need to do you need to press “CTRL + Hold Left Mouse Button” and then align it north
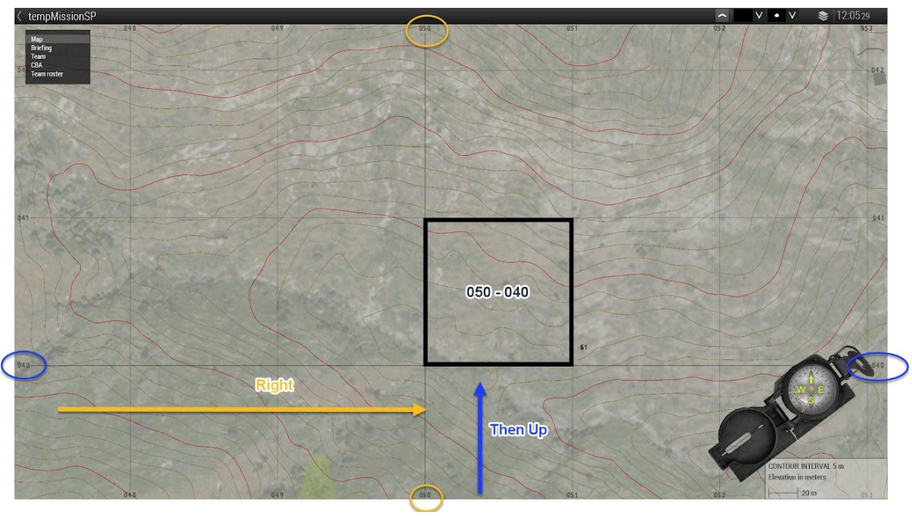
Example: find the 8 digit grid of the circled radio tower.
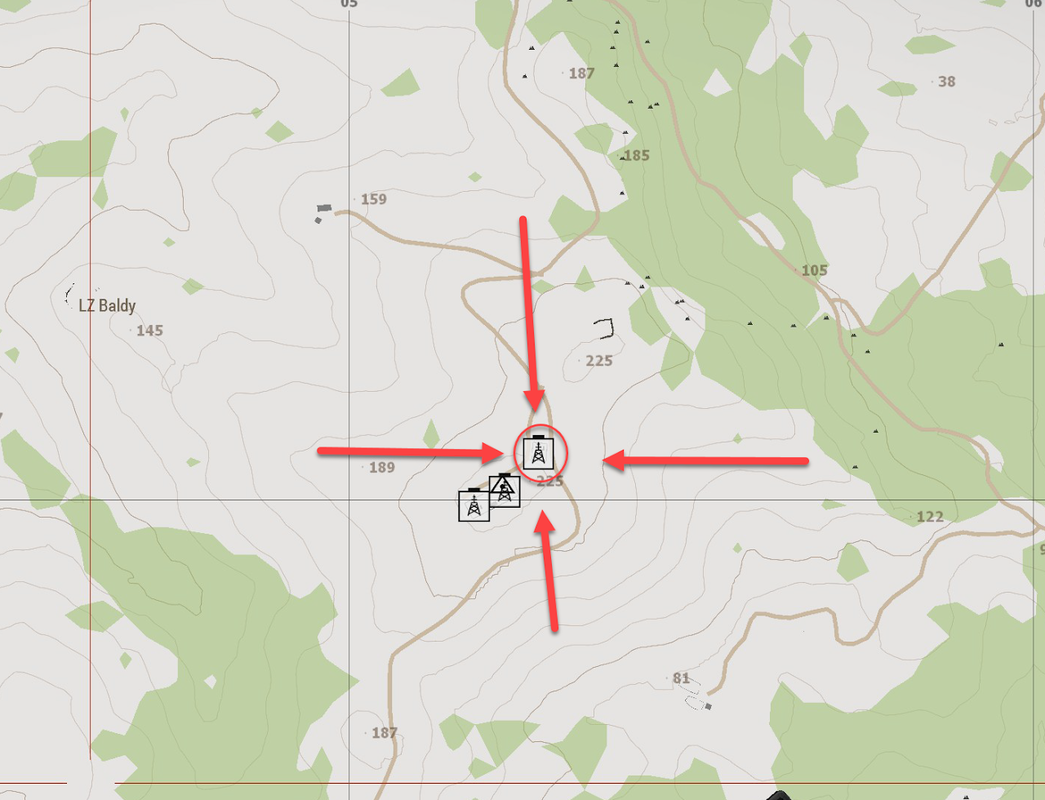
1. First line the map tools over the radio tower where the 0 and 0 intersect in the upper right of the map tools
2. The align the nearest line on the grid lines on the map in this case it's 052 (up) and 050 (right)
3. Then count the smaller marks to the tower
4. So the 8 digit grid is 0528 0507
2. The align the nearest line on the grid lines on the map in this case it's 052 (up) and 050 (right)
3. Then count the smaller marks to the tower
4. So the 8 digit grid is 0528 0507

Guesstimate
Every grid is based on a scale of 10, so the center will always be the 5’s
Example: (let's round up for this)
If the grid below was 023 043 (the six digit), the center of it would be 0235 0435 for the eight digit , and the village in the lower right ¼ would be 0237 0433
Example: (let's round up for this)
If the grid below was 023 043 (the six digit), the center of it would be 0235 0435 for the eight digit , and the village in the lower right ¼ would be 0237 0433
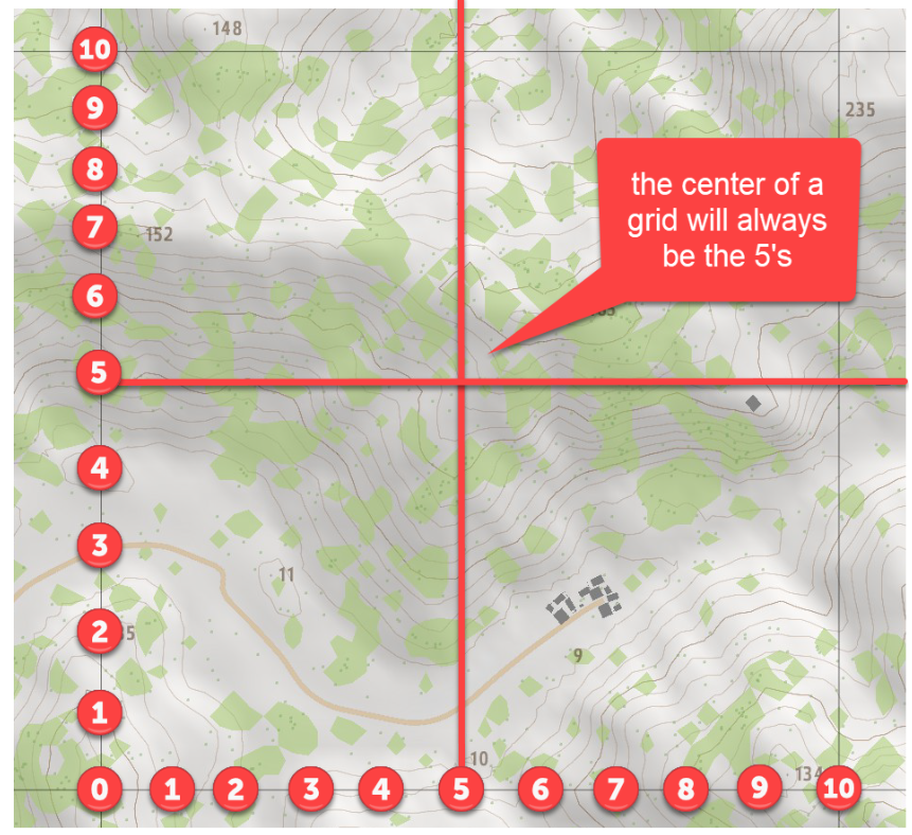
Note that this is not good enough for artillery or close air support but good enough to find what you're talking about on a map.
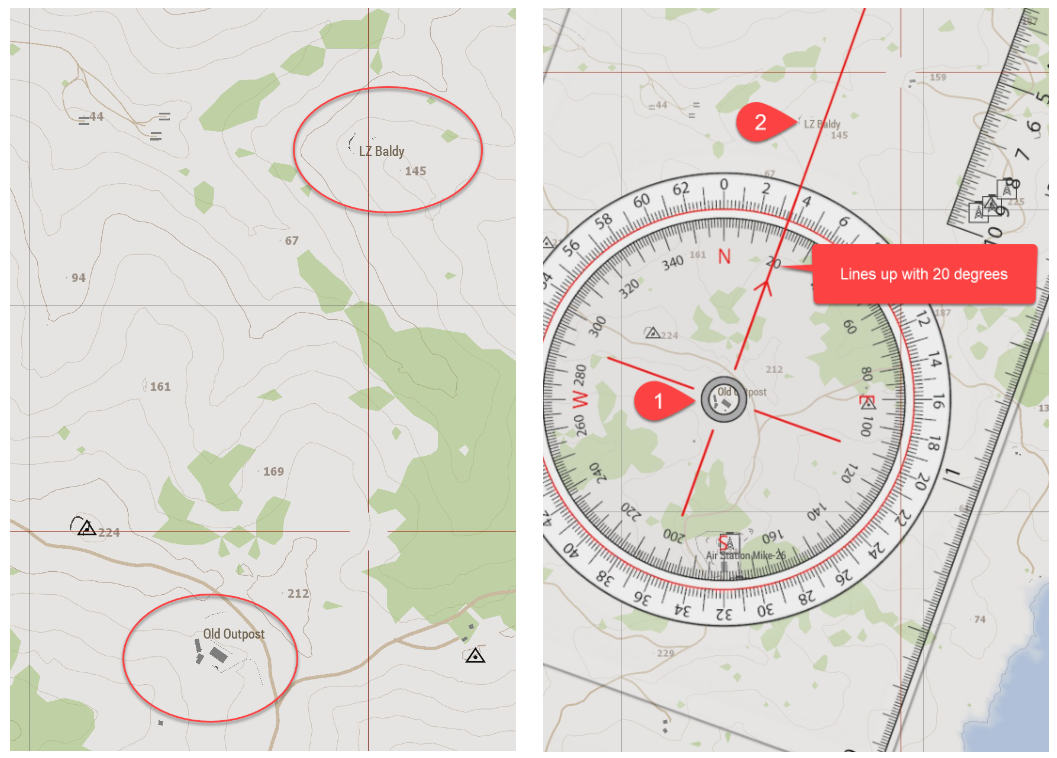
Bearing From A Map
To get the bearing from Old Outpost to LZ Baldy
1. Place the map tools over the old outpost
2. Rotate them till the center red line is over LZ Baldy
1. Place the map tools over the old outpost
2. Rotate them till the center red line is over LZ Baldy
Compass
The compass is a tool used to measure direction. The version modeled in Arma is a lensatic compass with both degree and milliradian markings.
Measuring direction is generally using the cardinal directions, or more precise using degrees. Mils are not commonly used.
Cardinal Direction: The four cardinal directions are displayed on the center of the compass ring and allow for quick reference of general direction.
Bearing Degrees: The inner ring of the compass shows degrees printed every ten degrees and a hash mark every five degrees. There are 360 degrees.
Bearing Mils: The outer ring of the compass shows mils printed every 200 mils, large hash mark every 100 mils, and a small hash mark every 20 mils. There are 6400 mils. This should be used for artillery calls only.
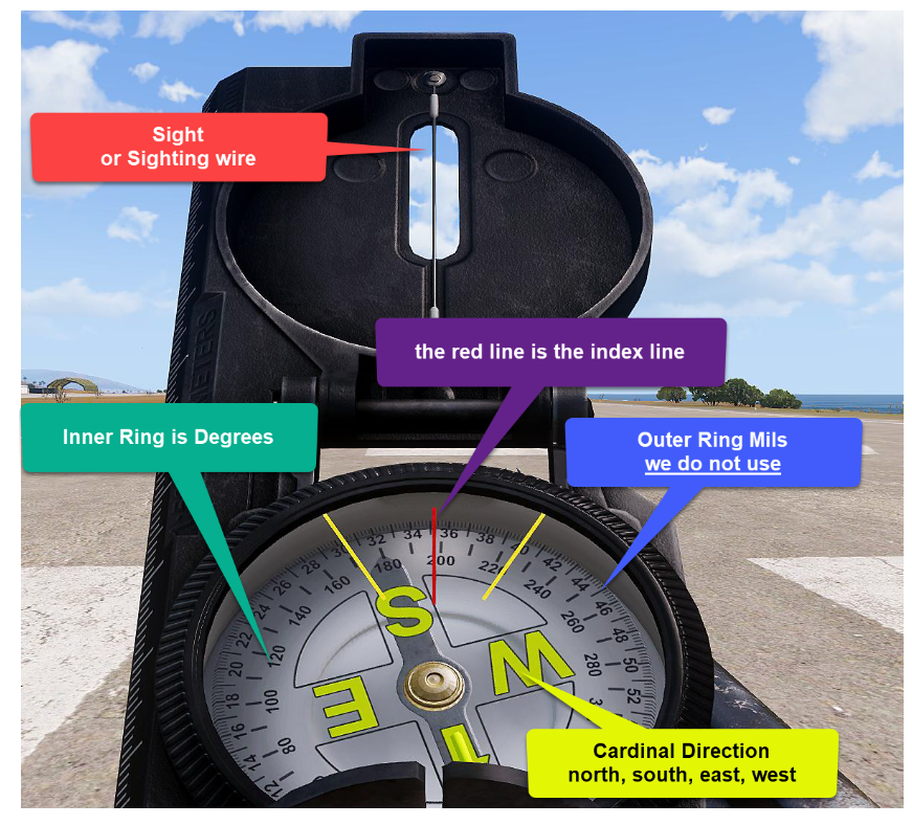
Never travel with the compass open and blocking a large portion of your screen
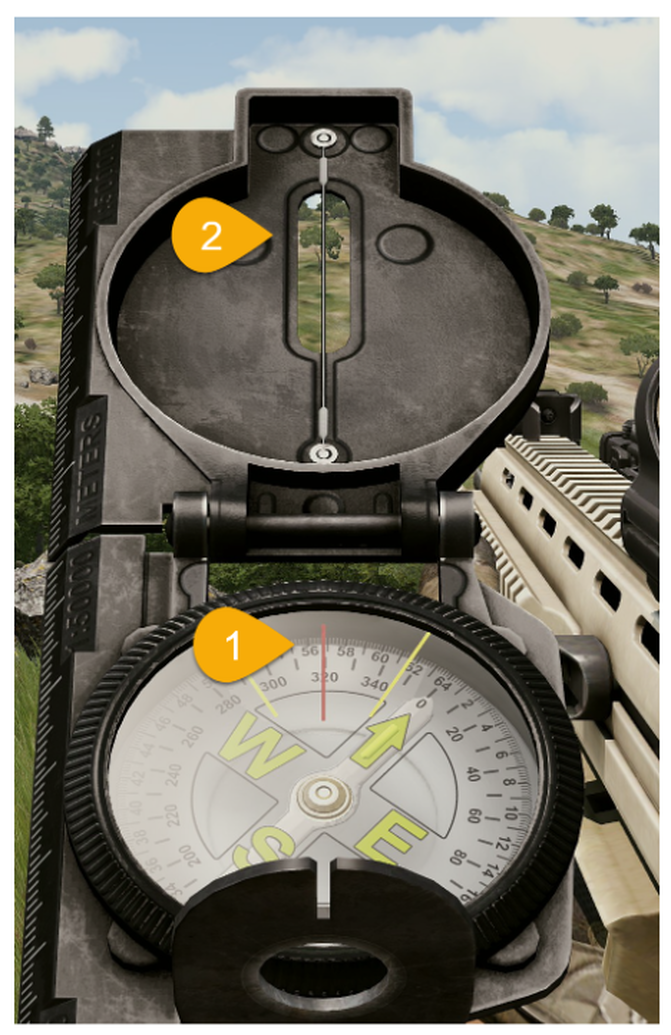
1. Take a heading , in this example 320 degrees
2. Look through the sight and find an easy to remember target
3. Move to the target then rinse and repeat
1. Take a heading , in this example 320 degrees
2. Look through the sight and find an easy to remember target
3. Move to the target then rinse and repeat
Transfer Map to Reality
First things first: To use a map and compass successfully, you need to triangulate a "fix" on your position. Or to put it in simpler words, you have to figure out where you are on that map.
Know which way is up. Maps are always printed with north at the top. Using a compass, orient the map so that it aligns with magnetic north.
Find key landmarks. Once you have the map oriented, look around you for terrain features like a lake, river, or mountain peak. Identify the same features on the map. This is known as terrain association.
Plot a course. Looking up with your compass in hand, point the red arrow of the compass's base plate (this is called "shooting a bearing" in orienteering speak) at the visible terrain feature. If the compass shows a bearing of, say, 320 degrees, draw a line from that feature on the map at an angle of 140 degrees (320 minus 180). You are somewhere on that line, called a line of position (LOP).
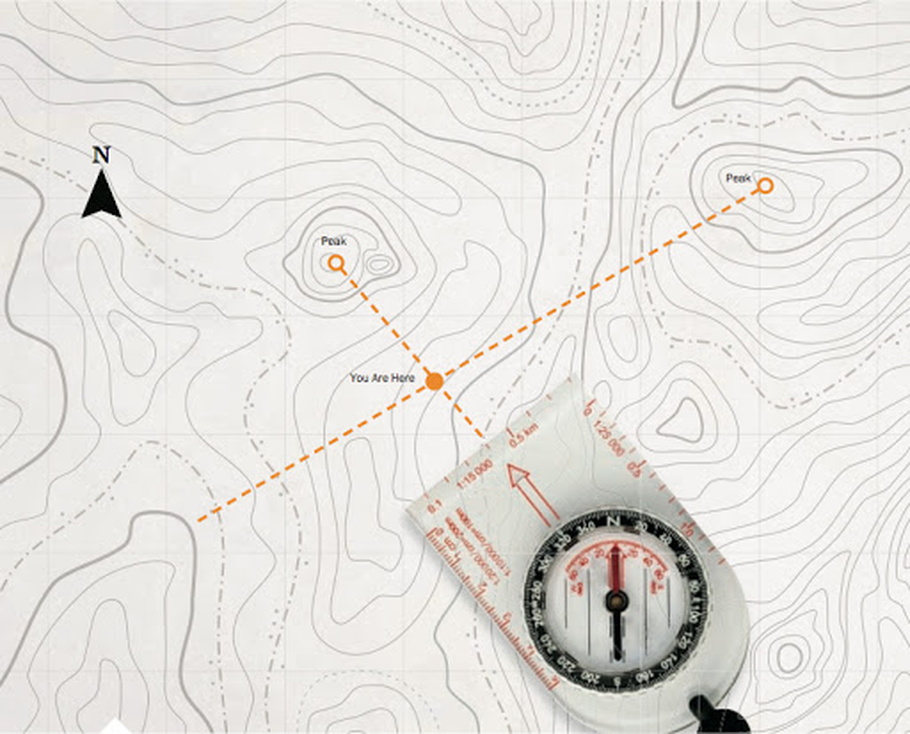
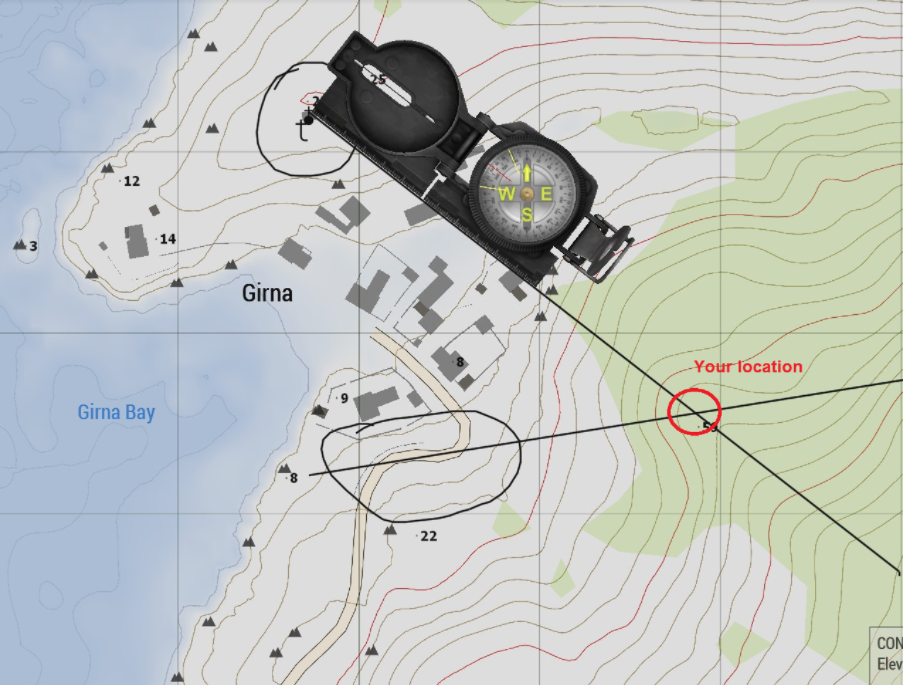
Lay a foundation. You don't know where you are on that line until you shoot another bearing, preferably at something between 60 and 120 degrees from the first one. When you draw the second LOP on the map, extend it so it crosses the first one. Where the two LOPs intersect is your "fix". That's where you are. Once you know your position, other decisions, such as which way to walk, becomes much easier.
Finding Out Where You Are
If you have a GPS, it's easy. You read off your grid square and look it up on the map. But how do you find your location without GPS? To show you how to find out where you are, we'll cover a basic example on utilizing the above principles.
1. Close in Area
Assess roughly where you can possibly be. Seldom the whole map is a option. It starts with your knowledge of where you were previously and asses how far you could have possibly moved. It continues with obvious features in your vicinity. Bodies of water, collection of buildings, big mountains...
Example:
There is the sea to the West and a town in front on the coast
Example:
There is the sea to the West and a town in front on the coast
2. Identify Points in the Surrounding
Now look out for distinct features in your vicinity that let you determine in which of the possible areas you are exactly. Look for special buildings, distinct terrain features, etc.
Example:
There is a distinctive S-curve and a church.
Example:
There is a distinctive S-curve and a church.

Matching all of the information, you can determine that you are roughly in this area.
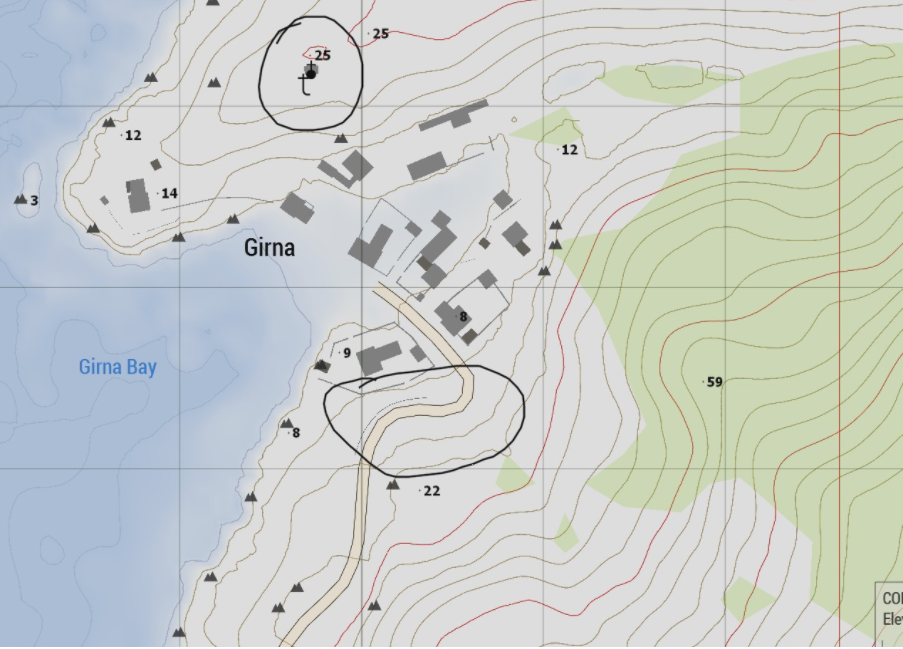
Sea to the west, coastal town with a church north uphill, and a S-curve south
3. Asses Relative Position
Having found out around which distinct features you are, you can now pinpoint your location with your compass.
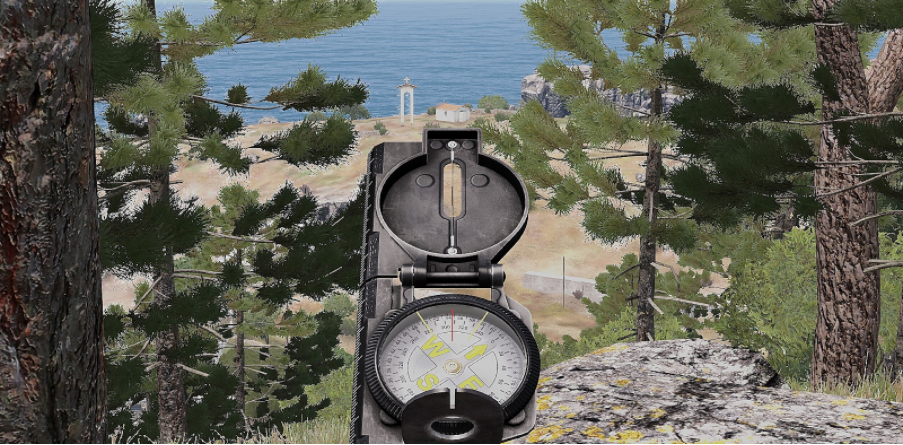
Targeting the church to use the aligned compass on the map.
4. Setting the Angle
By determining your relative angle to two or more features you can now crosspoint your location.
5. Setting the Distance
By determining your relative angle and distance to one feature you can pinpoint your relative position. This error is sensitive and therefore often not so exact but doesn't need multiple features.
Assessing Where You Move
In the absence of features that let you determine your position you can observe your movement from a starting point to estimate your current position. You will need to know your direction of movement and your velocity.
Obtain your direction of movement from your start point with the compass. Knowing your velocity and what time passed you can determine your current position
Obtain your direction of movement from your start point with the compass. Knowing your velocity and what time passed you can determine your current position
|
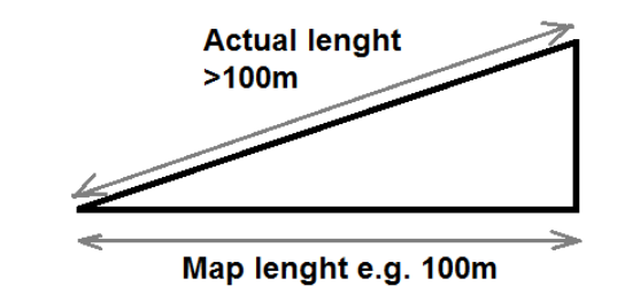
The movement velocity over ground is constant in Arma but your map velocity depends on how steep the terrain is (Research Pythagorean theorem)
|
As long as you don't climb at least a big hill you can neglect that.
Steps in Arma are also uniform so instead of stopping time you can count steps.
Steps in Arma are also uniform so instead of stopping time you can count steps.
Speeds:
Walking
100m: 163 Steps; 1:08 min
Slow jog
100m: 76 Steps; 0:36 min
Fast jog
100m: 101 Steps; 0:30 min
Jog - no weapon in hand
100m: 64 Steps; 0:25 min
Sprint
100m: 64 Steps; 0:21 min
Walking
100m: 163 Steps; 1:08 min
Slow jog
100m: 76 Steps; 0:36 min
Fast jog
100m: 101 Steps; 0:30 min
Jog - no weapon in hand
100m: 64 Steps; 0:25 min
Sprint
100m: 64 Steps; 0:21 min
Setting the Course
When moving around the field, you will not always have have time to pinpoint your location. You will also likely have to cross country where determining your position is difficult. Just running a free-chosen path can easily become extraordinary difficult.
To ease navigation and make success more likely you should break a chosen path into individual sections, making a movement plan.
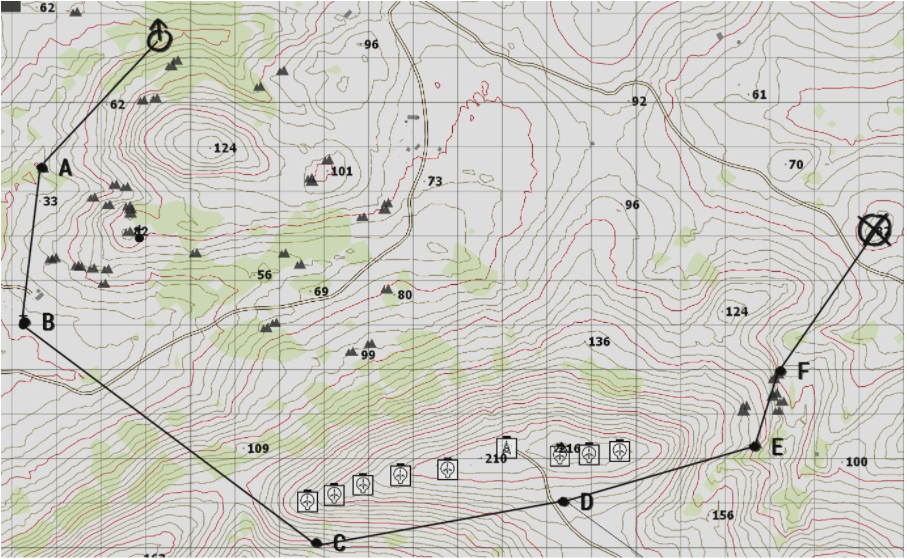
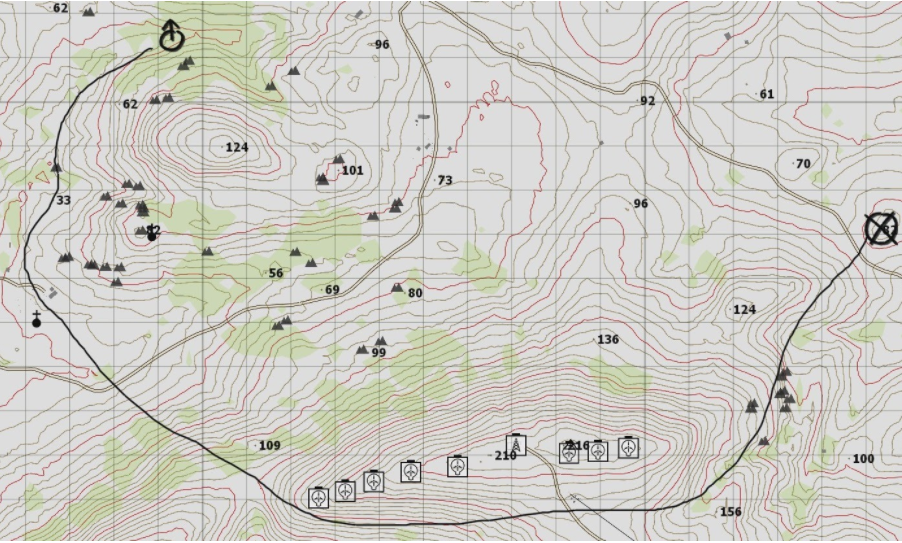
“Point A to F are typically called checkpoints, rally/regroup or rendezvous points, etc. They are chosen around easy to recognize positions and around features which allow you to pinpoint your position. Like this they allow you to quickly see if you reached a turning point in your path where you change your course and correct your movement should you have fallen off track on your way and did not reach the checkpoint spot on.
Check D for example. It's easily recognizable by the street you have to cross and the hut you reach. The distinct hut and the windmills around allow you to pinpoint your position around the checkpoint (should you not hit the hut spot on) allowing you to make correction on for your next course.
If you have the luxury to move around dominant features along your path to your next checkpoint you are basically free to move on your way to the next checkpoint, allowing you to use cover and concealment most effectively and not having to follow a straight line. Features like that are e.g. rivers or towers. See C-D for example. You will just follow the contour of the windmills further downhill.
Should this luxury be missing you will have to determine your compass bearing to your target and follow it in a further or less straight line. Additionally, keep track of your travelled distance to not accidentally miss your checkpoint.
To further prevent missing out checkpoints be aware of no-go limits. Check the path A-B in the example. If you cross the street you definitely overshoot your checkpoint. The street is your no-go limit.
Choosing Your Way on The Battlefield
How do you practically develop a route now?
Determine a path
Following consideration have to flow minimally into an effective route plan:
1. Missings & Deviations
• What is incorrect and missing on my map?
• What additional information do I have over the terrain?
• What is likely and how will it influence my plan?
2. Speed & Obstacles
• Where can I move how fast?
• Where could I encounter obstacles and how could I overcome or bypass them?
3. Available cover and concealment
• Where can I move as concealment as possible?
• Where can I fight and move when contact happens?
4. Danger areas
• Where do I have to cross terrain that leaves me dangerously exposed?
• How can I migrate the risk?
5. Enemy observation points and routes
• Where could the enemy have good points and routes for observation posts and patrols?
• How could I confirm or reject enemy presents there?
• How and when could I move past them?
6. Enemy movement control efforts
• Which planes of movement could the enemy control?
• How could I confirm or deny enemy presences there?
• How and when could I eject/move around them?
Moving in the Field
The result is a movement plan consisting of checkpoints, dominant features, pace counts and no-go limits and has a deployment plan for the forces including formations and movement techniques.
It further supplements this with plans for temporary halts (listening halts, rest holds,...), rally points for and bug out plans for lost personnel and alternative plans for likely occurrences.
It further has a combat plan for every point and time on the movement for how to get into a fight under the best circumstances, how to disengage and deal with pursuit and a support plan from other units.
