Patrols are missions to gather information or to conduct combat operations. Infantry platoons and squads typically conduct three types of patrols: reconnaissance, combat and tracking, This chapter describes the planning considerations used in preparation for patrols.
A patrol is a mission profile in which an element is designated to keep watch over an area by regularly walking or travelling around or through it. Patrolling is a very general term used to describe a unit that is on the move and is doing something other than attacking a fixed enemy position. Patrol formations are often used during movement in hostile terrain.
Patrols are some of the most important combat operations conducted. The size of an element in a patrol can be anywhere from a fireteam to a battalion. The mission often determines the size of the patrol.
Patrols are some of the most important combat operations conducted. The size of an element in a patrol can be anywhere from a fireteam to a battalion. The mission often determines the size of the patrol.
Types of Patrol
There are six primary types of patrols. The acronym used is RACESS. This stands for the following:
1. Recon
2. Ambush
3. Contact
4. Economy Of Force
5. Security
6. Search and Attack / Combat
The mission of the patrol heavily influences how it is organized and how it will react to enemy contact. Not all patrols will stand and fight, even if they are superior to the enemy.
1. Recon
2. Ambush
3. Contact
4. Economy Of Force
5. Security
6. Search and Attack / Combat
The mission of the patrol heavily influences how it is organized and how it will react to enemy contact. Not all patrols will stand and fight, even if they are superior to the enemy.
Recon Patrols
A recon patrol is usually small, a four to six light recce team. Recon patrols make every effort to avoid getting into a fight, or being detected by the enemy. The main weapon of a recon patrol is stealth. A recon patrol is typically armed with suppressors, chest rigs, soft covers, and light weapon systems/optics. The mission of a recon patrol is to gather more detailed information about the following aspects:
1. Point Recon – Point recon is a type of recon in which an element will gather information about a specific point/location. This point/location may be a target building, a fortified position, a small encampment, etc. The recon patrol will gather all relevant information about the target they are observing.
2. Area Recon – Area recon is a type of recon in which an element will gather information about an area or zone. This area could be a valley, a forest, a group of buildings, a town, etc. The recon patrol will gather all relevant information about the area, whether that be infiltration routes, exfiltration routes, innocent populous and more.
3. Route Recon – Route recon is a type of recon in which an element will provide recon on a planned out route and gather information on anything relevant regarding that route such as enemy patrols passing through, convoys, etc. Often times, elements conducting route recon will also provide security on that route until a main force is able to pass through.
The recon patrol will gather any and every bit of information about its objective that it can.
Ambush Patrols
An ambush patrol is tasked with setting up an ambush in a specific area, usually along a road or a trail used by the enemy. The ambush patrol sneaks into the ambush site and waits for the enemy to walk into it. After the ambush it sneaks back to friendly lines.
An ambush patrol works well when used to psychologically attack the enemy. If the enemy moves around frequently at night (like in asymmetric warfare) and they experience several costly ambushes they will be much more scared of moving around at night for fear of ambush. An ambush is also an effective way to inflict casualties on the enemy. It is a surprise attack designed to inflict the most casualties on a moving enemy. Fear of getting shot by an unseen attacker is the worst kind of fear because you must be constantly alert (which is stressful) and even then there is no promise you won’t be shot.
An ambush patrol works well when used to psychologically attack the enemy. If the enemy moves around frequently at night (like in asymmetric warfare) and they experience several costly ambushes they will be much more scared of moving around at night for fear of ambush. An ambush is also an effective way to inflict casualties on the enemy. It is a surprise attack designed to inflict the most casualties on a moving enemy. Fear of getting shot by an unseen attacker is the worst kind of fear because you must be constantly alert (which is stressful) and even then there is no promise you won’t be shot.
Contact Patrols
The contact patrol has two different uses.
One is to make contact with friendly forces. The same procedures used for other patrols are used for contact patrols. The patrol is assigned the mission of going out, finding a friendly unit or patrol, and either giving them some information or guiding them back to the unit that sent it out. With this kind of patrol the most dangerous part is making contact with the friendlies. It is usually very easy to mistake a camouflaged individual for an enemy soldier and neither side wants to expose themselves for fear that the enemy will see them or the other group as the enemy.
The other type of contact patrol is when friendly forces have been engaged with the enemy and for whatever reason cannot immediately pursue. In this case a patrol may be sent out to maintain contact with the enemy so he doesn’t get away. This type of patrol is more like a running gun battle with frequent breaks in the action or a patrol that is tracking the enemy and not giving him time to conceal his tracks or lay false trails. If the enemy turns around and runs like rabbits they will probably be shot in the back. If the patrol moves to fast they might get suckered into a trap and killed.
Economy Of Force Patrol
This kind of patrol is used to support the operations of larger forces. For example, a battalion is going to cross a bridge later on in the day. To make sure it is safe they send out a patrol to scout it out and make sure the enemy does not set up an ambush there. This type of patrolling is similar to a Route Recon Patrol as the patrol will recon the route that a force will be moving to. The only difference is that the patrol will maintain security at the area until the main force has passed through.
An EOF patrol might be sent out to also occupy a certain strategic hill or other terrain feature. An EOF patrol is basically the force commander making good use of his forces.
An EOF patrol might be sent out to also occupy a certain strategic hill or other terrain feature. An EOF patrol is basically the force commander making good use of his forces.
Security Patrol
A security patrol is used to screen the flanks, front or rear of a larger unit. The security patrol is responsible for a certain area and warns the higher command of enemy forces. This ruins the enemy’s chance of surprise and gives the higher command time to prepare.
Security patrols can be used where the force is dug in waiting for the enemy and doesn’t want to be surprised or it can be used when a force is moving.
Security patrols can be used where the force is dug in waiting for the enemy and doesn’t want to be surprised or it can be used when a force is moving.
Search and Attack / Combat Patrol
Commonly known as combat patrols, these patrols are the most aggressive use of patrols where the patrol "looks for trouble." Heavily armed patrols are assigned areas in which they actively search for the enemy forces. Once enemy forces are found the patrol attacks and attempts to destroy them. The size of a search and attack patrol typically ranges from a 4 man team to a platoon. It is unlikely, but possible to use fireteams and smaller groups in this role. It should be noted that it is very likely a fireteam will be outnumbered and outgunned by the opposition unless the fireteam was relying on stealth and artillery support. A fireteam sized S&A patrol would also be excellent for a hit and run type of mission profile.
Reinforcements are usually kept on standby just in case the patrol bites off more that it can chew. Fire support is also kept on standby just in case.
Reinforcements are usually kept on standby just in case the patrol bites off more that it can chew. Fire support is also kept on standby just in case.
Planning
This section provides considerations common to most patrols, the required tasks that guide the team and team leader in organizing patrols, the initial planning and coordination requirements, and the coordination requirements for the departure and re-entry of friendly forces.
In all, patrols and any actions conducted are governed by five principles: planning, reconnaissance, security, control, and common sense. In brief, each principle involves--
• Planning: quickly make a simple plan and effectively communicate it to the lowest level. A great plan that takes forever to complete and is poorly disseminated is not a great plan. Plan and prepare to a realistic standard and rehearse everything.
• Reconnaissance: your responsibility as a leader is to confirm what you think you know, and to learn that which you do not already know.
• Security: preserve your force as a whole. Every member and every rifle counts, either one could be the difference between victory and defeat.
• Control: clarify the concept of the operation and commander’s intent, coupled with disciplined communications, to bring every member and weapon available to overwhelm the enemy at the decisive point.
• Common sense: use all available information and good judgment to make sound, timely decisions.
Organization
To accomplish the patrolling mission, a unit must perform specific tasks. For example; secure an area, danger area crossings, or rally points, recon the patrol objective, breach, support or assault, etc. As with other missions, the leader tasks elements of his team in accordance with his estimate of the situation. He identifies those tasks the unit must perform and decides which elements will perform them. Where possible, in assigning tasks, the leader should maintain team and fireteam integrity. The chain of command continues to lead its elements during a patrol. Squads and fire teams may perform more than one task in an assigned sequence whereas others may perform only one task. The leader must plan carefully to ensure that he has identified and assigned all required tasks in the most efficient way. The following elements are common but not limited to all patrols:
1. Headquarters Element – The HQ typically consists of the Patrol Leader and Radio Operator. It may consist of any attachments that the leader decides that he or his second in command must control directly.
2. Aid and Litter Element – Aid and litter elements are responsible for treating and evacuating casualties.
3. Enemy Prisoner of War Element – EPW teams are responsible for controlling enemy prisoners IAW the five S's and the leader's guidance.
4. En Route Recorder. The en route recorder records all information collected during the mission
4. Surveillance Element – The Surveillance Element is responsible for surveillance on the objective. The surveillance team keeps watch on the objective from the time that the leader's reconnaissance ends until the unit deploys for actions on the objective. They then join their element.
6. Compassman The compass man assists in navigation by ensuring the team leader remains on course at all times. Instructions to the compass man must include an initial azimuth with subsequent azimuths provided as necessary. The compass man should preset his compass on the initial azimuth before moving out, especially if the move will be during limited visibility conditions. The unit leader should also designate an alternate compass man..
5. Pointman – The pointman is positioned several meters ahead of the main force and is responsible for maintaining an eye for any characteristics that may be betray the presence of an ambush or attack.
6. Pace Man. The pace man maintains an accurate pace at all times. The unit leader should designate how often the pace man is to report the pace to him. The pace man should also report the pace at the end of each leg. The leader should also designate an alternate pace man.
Initial Planning and Coordination
Leaders plan and prepare for patrols using the troop leading procedures and the estimate of the situation. Leaders identify required actions on the objective, then plan backward to the departure from friendly lines and forward to the reentry of friendly lines. They normally receive the OPORD in the troop command post where communications are good and key personnel are available. Because patrols act independently, move beyond the direct fire-support of the troop, and operate forward of friendly units, coordination must be thorough and detailed. Leaders normally coordinate directly with the troop staff. They coordinate continuously throughout the planning and preparation phases. They use checklists to preclude omitting any items vital to the accomplishment of the mission. Items that must be coordinated are as follows:
1. Changes or updates in the enemy situation
2. Best use of terrain for routes, rally points, and patrol bases
3. Light and weather data
4. Changes in friendly situation
5. The attachment of troops with special equipment. For example, engineers, sniper teams, scout dog teams, other government agencies, FO or interpreters.
6. Use and location of landings zones
7. Departure and reentry of friendly lines
8. Fire support on the objective and along the planned routes, including alternate routes.
9. Rehearsal areas and times. The terrain for the rehearsal should be similar to that of the objective, to include buildings and fortifications if necessary. Coordination for rehearsals include security of the area, use of blanks, pyrotechnics and live ammunition.
10. Special equipment requirements
11. Transportation support, including transportation to and from the rehearsal site.
12. Signal plan - call signs, frequencies, code words, challenge and password.
The leader coordinates with the unit through which his team will conduct it’s forward and rearward passage of lines.
The leader also coordinates patrol activities with the leaders of other units that will be patrolling in adjacent areas at the same time.
Completion of the Plan
As the leader completes his plan, he considers the following.
a. Essential and Supporting Tasks. The leader ensures that he has assigned all essential tasks to be performed on the objective, at rally points, at danger areas, at security or surveillance locations, along the route(s), and at passage lanes.
b. Key Travel and Execution Times. The leader estimates time requirements for movement to the objective, leader's reconnaissance of the objective, establishment of security and surveillance, compaction of all assigned tasks on the objective, movement to an objective rally point to debrief the unit, and return to and through friendly lines.
c. Primary and Alternate Routes. The leader selects primary and alternate routes to and from the objective. The return routes should differ from the routes to the objective.
d. Signals. The leader should consider the use of special signals. These include arm-and-hand signals, flares, voice, whistles, radios, and infrared equipment. All signals must be rehearsed so that all personnel know what they mean. The leader will specify before the patrol certain signals. These signals will vary from arm and hand signals to mission codes. The two most common types are as follows:
1. Hand signals – standardized hand signals.
2. Mission Code – A term on the radio that signifies something previously stated in the OPORD.
Examples of mission codes could be given to signal reentry into blue lines, execution of a target etc.
e. Challenge and Password Forward of Friendly Lines. The challenge and password from the signal operating instructions must not be used beyond the forward edge of the battle area.
(1) The unit can use the odd-number system. The leader specifies an odd number. The challenge can be any number less than the specified number. The password will be the number that must be added to it to equal the specified number.
(2) The leader can also designate a running password. This code word alerts a unit that friendly troops are approaching in a less than organized manner and possibly under pressure. This may be used to get troops quickly through a compromised passage of friendly lines. The running password is followed by the number of troop approaching ("Moosebreath five"). This prevents the enemy from joining a group in an attempt to penetrate a friendly unit.
f. Location of Leaders. The leader considers where he and his second in command and other key leaders should be located for each phase of the patrol mission. The second in command is normally with the following elements for each type of patrol.
• On a raid or ambush, he normally controls the support element.
• On an area reconnaissance, he normally stays in the ORP.
• On a zone reconnaissance, he normally moves with the reconnaissance element that sets up the link-up point.
g. Actions on Enemy Contact. Unless required by the mission, the unit avoids enemy contact. The leader's plan must address actions on chance contact at each phase of the patrol mission. The unit's ability to continue the mission will depend on how early contact is made, whether the unit is able to break contact successfully (so that its subsequent direction of movement is undetected), and whether the unit receives any casualties as a result of the contact.
(1) The plan must address the handling of seriously wounded troops and KIAs.
(2) The plan must address the standard operating procedure on how to react when contact is made
3) The plan must address the handling of prisoners who are captured as a result of chance contact and are not part of the planned mission.
h. Contingency Plans. The leader leaves for many reasons throughout the planning, coordination, preparation, and execution of his patrol mission. Each time the leader departs without radio or wire communications, he must issue a five-point contingency plan. The contingency plan includes--
• Where the leader is going.
• Who he is taking with him.
• The amount of time he plans to be gone.
• The actions taken if the leader does not return.
• The unit's and the leader's actions on chance contact while the leader is gone.
Departure of Friendly Lines
The departure from friendly lines must be thoroughly planned and coordinated.
a. Coordination. The leader must coordinate with the commander of the forward unit and the leaders of other units that will be patrolling in the same or adjacent areas. The coordination includes signal operating instructions plan, information, signal plan, fire plan, running password, procedures for departure and reentry lines, dismount points, initial rally points, departure and reentry points, and information about the enemy.
(1) The leader provides the forward unit leader with the unit identification, the size of the patrol, the departure and return times, and the area of operation.
(2) The forward unit leader provides the patrol leader with the following:
• Additional information on terrain.
• Known or suspected enemy positions.
• Likely enemy ambush sites.
• Latest enemy activity.
• Detailed information on friendly positions and obstacle locations. This includes the location of OPs.
• Friendly unit fire plan.
• Support that the unit can provide; for example, fire support, litter teams, guides, communications, and reaction force.
b. Planning. In his plan for the depature of friendly lines, the leader should consider the following sequence of actions:
• Making contact with friendly guides at the contact point.
• Moving to the coordinated initial rally point.
• Completing final coordination.
• Moving to and through the passage point.
• Establishing a security-listening halt beyond the friendly unit's final protective fires.
Route Planning
After the initial planning and coordination phase the leader and any assigned pointmen will refer to the maps and decide upon three routes; Primary, Secondary, Tertiary.
Each route must include the following:
1. Detailed route plan – The route plan should be suited for the type of patrol being conducted.
2. Rally Points – There must be a multitude of rally points. There must be one rally point for every 400 meters patrolled.
3. Navigation points – Navigation points which are connected to a mission code.
4. Infil/Exfil routes – There must be an infil route and an exfil route back to friendly lines.
Rally Points
The leader considers the use and locations of rally points. A rally point is a place designated by the leader where the platoon moves to reassemble and reorganize if it becomes dispersed.
The leader physically recons routes to select rally points whenever possible. He selects tentative points if he can only conduct a map reconnaissance. He confirms them by actual inspection as the team moves through them. Rally points must:
1. Be easy to find
2. Have cover and concealment
3. Be away from natural lines of drift
4. Be defendable for short periods
Types of Rally Points
The most common types of rally points are initial, en route, objective, reentry, and near- and far-side rally points. Troops must know which rally point to move to at each phase of the patrol mission. They should know what actions are required there and how long they are to wait at each rally point before moving to another.
(1) Initial rally point. An initial rally point is a place inside of friendly lines where a unit may assemble and reorganize if it makes enemy contact during the departure of friendly lines or before reaching the first en route rally point. It is normally selected by the commander of the friendly unit.
(2) En route rally point. The leader designates en route rally points every 100 to 400 meters (based on the terrain, vegetation, and visibility). When the leader designates a new en route rally point, the previously designated one goes into effect. This precludes uncertainty over which one troops should move to if contact is made immediately after the leader designates a new rally point. There are three ways to designate a rally point:
(a) Physically occupy them for a short period. This is the preferred method.
(b) Pass by at a distance and designate using arm-and-hand signals.
(c) Walk through and designate using arm-and-hand signals.
(3) Objective rally point. The objective rally point (ORP) is a point out of sight, sound, and small-arms range of the objective area. It is normally located in the direction that the platoon plans to move after completing its actions on the objective. The ORP is tentative until the objective is pinpointed. Actions at or from the ORP include--
• Setting up an OP
• Setting up an FOP over the objective
• Reconnoitering the objective.
• Issuing a FRAGO
• Disseminating information from reconnaissance if contact was not made
• Making final preparations before continuing operations; for example, recamouflaging: preparing demolitions; lining up rucksacks for quick recovery; preparing EPW bindings, first aid kits, and litters; and inspecting weapons, etc.
• Accounting for troops and equipment after actions at the objective are complete.
• Reestablishing the chain of command after the actions at the objective are complete.
Setting up an ORP:
• Halt beyond sight, sound, and small-arms weapons range of the tentative ORP (200 to 400 meters in good visibility; 100 to 200 meters in limited visibility).
• Position security.
• Move forward with a compass man and one member of each fire team to confirm the location of the ORP and determine its suitability. Issue a five-point contingency plan before departure.
• Position security around the ORP, then regroup with the primary unit.
• Position one member at 12 o'clock, and one member at 6 o'clock in the operational readiness force. Issue them a contingency plan and return with the compass man.
• Lead the unit into the ORP, position one team to monitor from 9 to 3 o'clock and another team to monitor from 3 to 9 o'clock. Change directions as necessary. The remaining members will conduct security at points not covered and the construction of the ORP will begin.
NOTE: The unit may also occupy the ORP by force. This requires more precise navigation, but eliminates separating the unit.
The leader should consider the same sequence in planning the occupation of an ORP. He brings a member from each team on his reconnaissance of the ORP and positions them at respective (generally 10, 2, and 6 o'clock) positions. The first team in the order of march establishes the base leg (generally 10 to 2 o'clock). The trailing squads occupy from rear points of security (2 to 6 o'clock and 6 to 10 o'clock), respectively.
(4) Reentry rally point. The reentry rally point is located out of sight, sound, and small-arms weapons range of the friendly unit through which the patrol will return. This also means that the RRP should be outside the final protective fires of the friendly unit. The patrol occupies the RRP as a security perimeter.
(5) Near-and far-side rally points. These rally points are on the near and far side of danger areas. If the patrol makes contact while crossing the danger area and control is lost, troops on either side move to the rally point nearest them. They establish security, reestablish the chain of command, determine their personnel and equipment status, and continue the patrol mission, link up at the ORP, or complete their last instructions.
Navigation Points
Navigation points are points designated by the team leader upon planning the patrol. Navigation points are 8 digit grid references that refer to a certain point on the patrol route. These points must be within 1000 meters of each other. The process for plotting Navigation Points are as follows:
1. Refer to map, Start from objective and plot backwards.
2. Plot first navigation point, obtain 8 digit grid reference.
3. Assign mission code, female name.
4. Write down all mission codes and respective grid references and provide them to unit command.
1. Refer to map, Start from objective and plot backwards.
2. Plot first navigation point, obtain 8 digit grid reference.
3. Assign mission code, female name.
4. Write down all mission codes and respective grid references and provide them to unit command.
Leader's Reconnaissance of the Objective
The plan must include a leader's reconnaissance of the objective once the unit establishes the operational readiness force. During his reconnaissance, the leader pinpoints the objective; selects security, support, and assault positions for his elements; and adjusts his plan based on his observation of the objective. Each type of patrol requires different tasks during the leader's reconnaissance. The leader will take different elements with him. The leader must plan time to return to the ORP, complete his plan, disseminate information, issue orders and instructions, and allow his elements to make any additional preparations.
Reentry of Friendly Lines
The platoon leader's initial planning and coordination must include the reentry of friendly lines. The leader should consider the following sequence.
Reentry of friendly lines at night is dangerous and should only be attempted when it is essential to the success of the patrol.
Reentry of friendly lines at night is dangerous and should only be attempted when it is essential to the success of the patrol.
1. The team halts in the RRP and establishes security.
2. The unit leader radios the code word advising the friendly unit of its location and that it is ready to return. The friendly unit must acknowledge the message and confirm the code. The friendly unit must also confirm that guides are waiting before the unit moves from the RRP if there are any.
(a)
If radio communications are not possible, the leader, radioman, and a two-man (buddy team) security element move forward and attempt to contact an OP using the challenge and password. The OP notifies the friendly unit that the patrol unit is ready to return and requests a guide.
(b)
If the leader cannot find an OP, he moves with the radioman and security element to locate the coordinated reentry point. He must move straight toward (and away from) friendly lines, never parallel to them. All lateral movement should be outside of small-arms weapons range.
NOTE: Theleader should only attempt this procedure during daylight. At night he should use other backup signals to make contact with friendly units. The preferred method is to wait until daylight if contact with the friendly unit cannot be made as planned.
3. Once the friendly unit acknowledges the return of the patrol, the patrol leader issues a five point contingency plan and moves with his radioman and a two-man security element on a determined azimuth and pace to the reentry point.
4. The patrol leader uses far and near recognition signals to establish contact with the guide.
5. The unit leader will signals the patrol forward, or returns and leads it to the reentry point. He may post a security element with the guide at the enemy side of the reentry point.
6. The second in command counts and identifies each member as he passes through the reentry point.
7. The guide leads the platoon to the assembly area.
8. The leader reports to the command post of the friendly unit. He tells the commander everything of tactical value concerning the friendly unit's area of responsibility.
9. The leader rejoins the element in the assembly area and leads it to a secure area for debriefing.
Debriefing
Immediately after the patrol returns, personnel from higher headquarters conduct a thorough AAR & debrief. This may include all members of the patrol or the leaders, radiomen, and any attached personnel. Normally the debriefing is oral. Sometimes a written report is required. Information on the report should include--
• Size and composition of the platoon conducting the patrol.
• Mission of the platoon (type of patrol, location, purpose).
• Departure and return times.
• Routes. Use check points, grid coordinates for each leg or include an overlay.
• Detailed description of terrain and enemy positions that were identified.
• Results of any contact with the enemy.
• Personnel status at the conclusion of the patrol mission, including the disposition of casualties.
• Conclusions or recommendations.
PAtrol LEADING
Troop Leading Steps
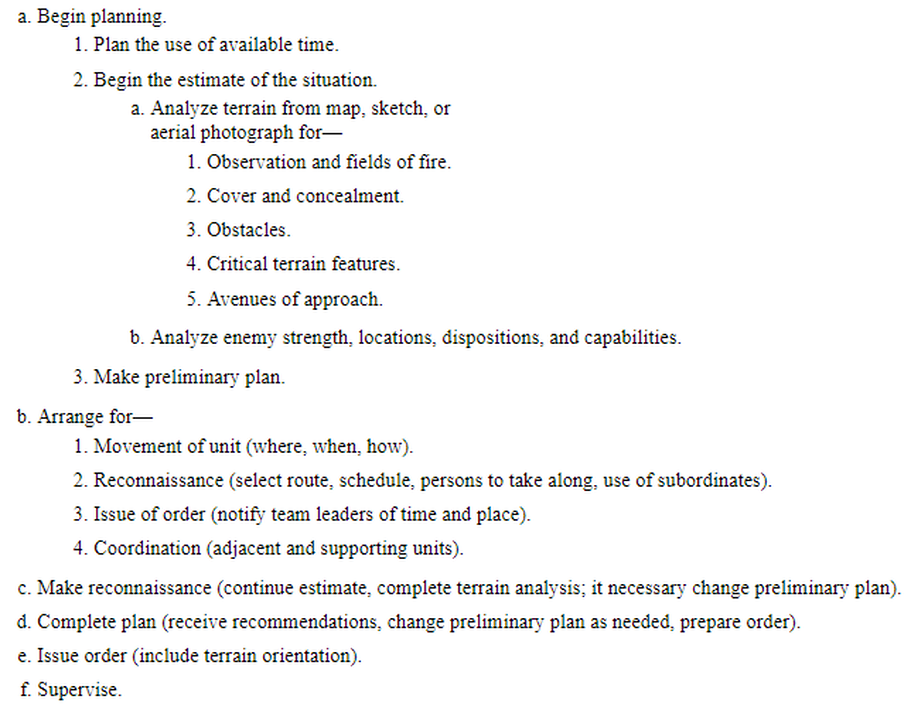
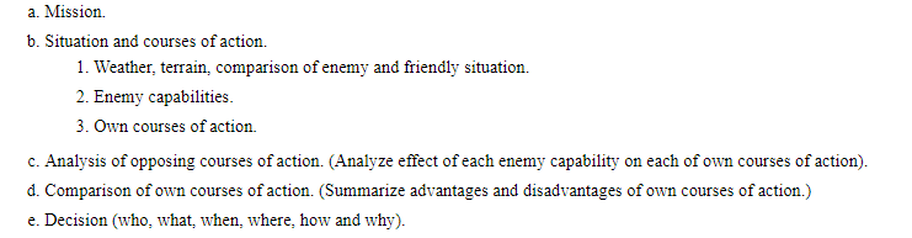
Estimate of the Situation
Patrolling

Patrol Warning Order

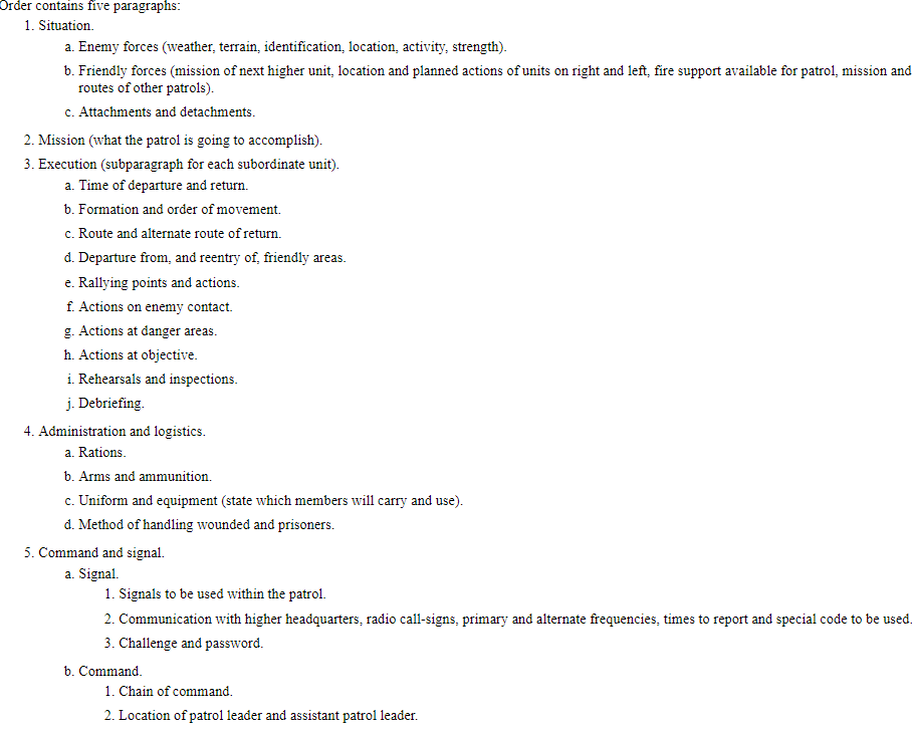
Patrol Leader's Order
Planning and Preparation
Execution
Patrol Tips
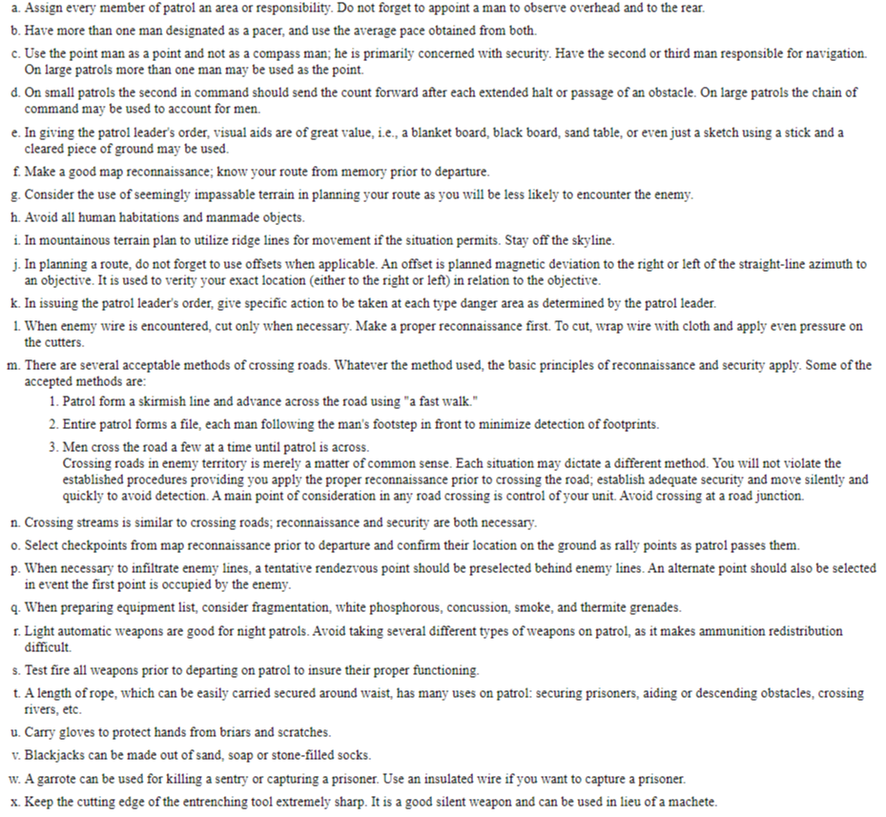
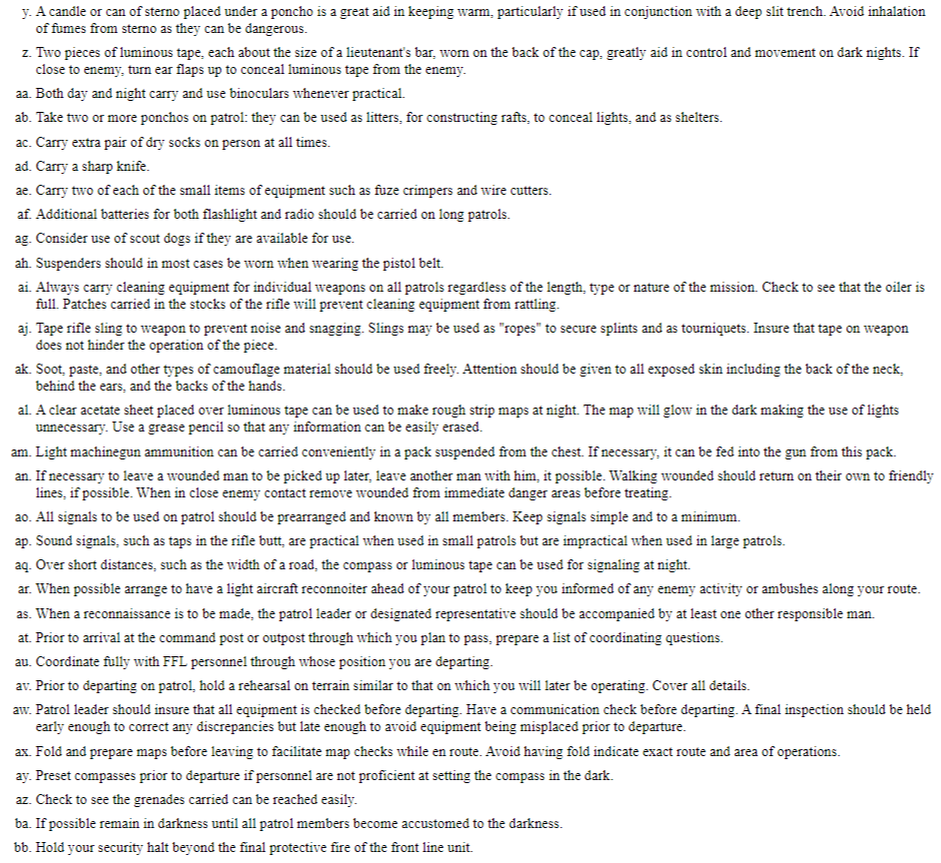
Section 1. PREPARATION
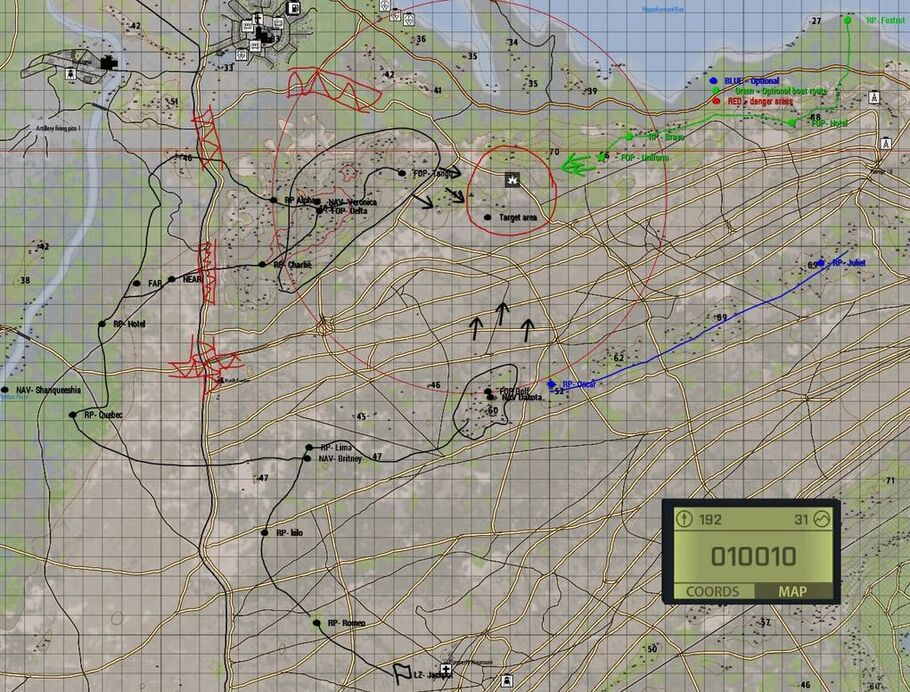
• Make a detailed map study and know the terrain over which you will pass, especially the terrain in the objective area.
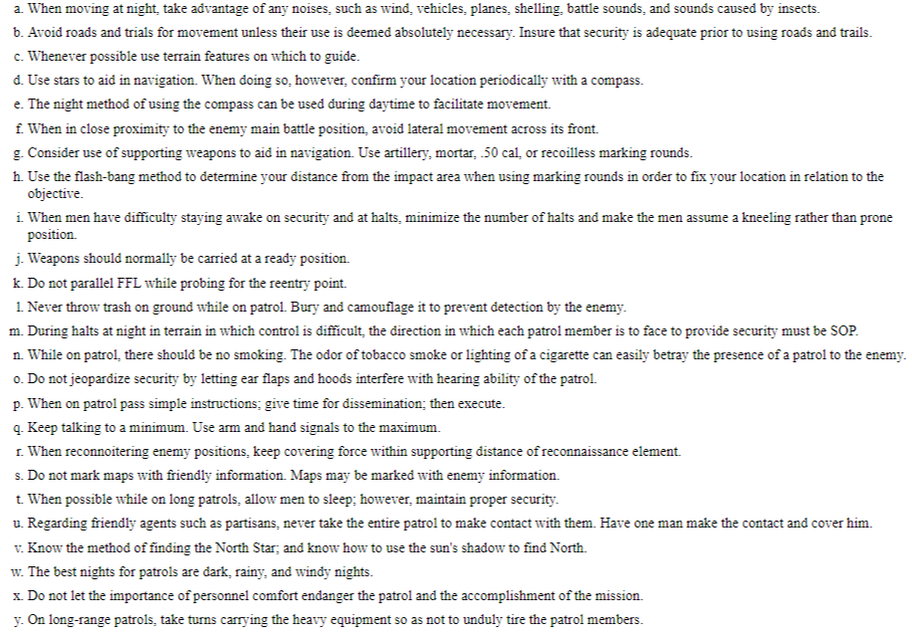
• Select your route carefully; consider the use of difficult terrain. Terrain is seldom impassible to a determined patrol. Plan an "off-set" in your route if this will assist in locating the objective. (An offset is a planned deviation lo the right or left of the straight line azimuth to the objective.) Use it to verify your location right or left of the objective. Each degree you offset will move you about 17 meters to the right or left for each 1,000 meters you travel..
• Select your route carefully; consider the use of difficult terrain. Terrain is seldom impassible to a determined patrol. Plan an "off-set" in your route if this will assist in locating the objective. (An offset is a planned deviation lo the right or left of the straight line azimuth to the objective.) Use it to verify your location right or left of the objective. Each degree you offset will move you about 17 meters to the right or left for each 1,000 meters you travel..
• If possible, take subordinate leaders with you on reconnaissance.
• When appropriate to the mission, arrange to have a light aircraft reconnoiter ahead of the patrol to keep you informed of any enemy activity along your route and act as radio relay when required.
• Consider all types of grenades: fragmentation, white phosphorus, concussion, and smoke, together with the use of the grenade launcher.
• Reconnaissance patrols should carry at least one automatic weapon. It provides valuable sustained firepower.
• Avoid taking weapons requiring different types of ammunition. It makes ammunition redistribution difficult.
• Carry individual weapons cleaning equipment on all patrols.
• Carry gloves to protect hands.
• Carry at least two flashlights and two each of such critical items as binoculars, wire-cutters, and fuze crimpers.
• Carry extra flashlight and radio batteries on long patrols.
• Every man should carry his canteen and poncho. Consider having each man carry two canteens on long patrols. If special circumstances make it undesirable for every man to carry his canteen and poncho, carry at least two of each in the patrol. Ponchos can be used to construct rafts, shelters, and litters, and to conceal lights.
• Have every man carry extra socks.
• Harness should be worn when the weapons belt is worn.
• Consider the use of scout dogs, if available.
• Use friction tape to secure rifle swivels, sling, and other items which might rattle.
• Be sure to camouflage the back of the neck, behind the ears, and the back of the hands.
• Provide for security by assigning every man an area of responsibility.
• Designate at least two pacers and use the average of their individual counts.
• Fold maps before departing so they can be more easily handled when checking.
• Preset compasses before departing. Preset more than one compass for each setting required.
• Prepare a list of questions or a checklist to be used at friendly positions with which you will coordinate.
Consider the use of field expedient antennas to increase radio range.
• A length of rope secured to the harness can be used for binding prisoners, climbing or descending obstacles, and crossing streams.
• Carry a grappling hook, with a 30-foot length of 1/4-inch rope. This can be used to dislodge items that may be boobytrapped, such as pieces of equipment, weapons, covers of"spider holes," and doors of tunnels. This is particularly useful in counterguerrilla operations. An expedient hook can be made of large, bent nails or very heavy wire.
• Two pieces of luminous tape, 1/2 inch by 11/2 inch, and 1 inch apart, pinned or sewed to the underside rear center of the collar aid in control and movement "on dark nights. Turn the collar down when near the enemy. When the soft field cap is worn the tape may be pinned or sewed at the rear center of the cap 1/2 inch above the bottom edge; cover or remove it when near the enemy.
• Become as familiar as possible with the sounds of birds and other animals in your area of operations, especially the sounds they make when disturbed. This applies to both wild and domestic birds and animals and is particularly useful in counterguerrilla operations. These sounds may warn you of the enemy's approach or presence. They may also alert the enemy to your approach or presence.
• Use available visual aids in issuing your patrol order. The use of a blanket board, blackboard, or a sketch on the ground is helpful.
• Prearrange and rehearse all signals to be used. Keep signals simple.
• Plan time for patrol members to dark-adapt their eyes if you have a night patrol.
• Clean, check, and test fire all weapons before departure.
• Conduct rehearsals on terrain similar to that over which you will operate. Conduct day and night rehearsals. for a night patrol.
• Inspect your patrol carefully before rehearsals and before departure. Question men to check their knowledge and understanding of the actions planned.
• Be sure that maps are not marked with information that might aid the enemy.
Section II. EXECUTION
• On small patrols, the count should be sent up automatically after each halt or passage of a danger area.
• In large patrols, use the chain of command to account for men.
• Use the point for security and not for navigation.
• Check navigation frequently. You are responsible.
• On long patrols, change point and compass men occasionally.
• Use an alternate challenge and password outside friendly areas.
• In mountainous terrain, use ridgelines for movement whenever possible, but do not move along ridgetops. Stay off the skyline.
• Weapons are always carried at a ready position.
• Cut enemy wire only when necessary. Make a reconnaissance first.
• When moving at night, take advantage of any noises such as wind; vehicles, aircraft, battle sounds, and even sounds caused by insects.
• Do not move on roads and trails unless absolutely necessary.
• Aid movement in daylight, especially in dense terrain, by using night compass settings.
• Avoid all human habitations.
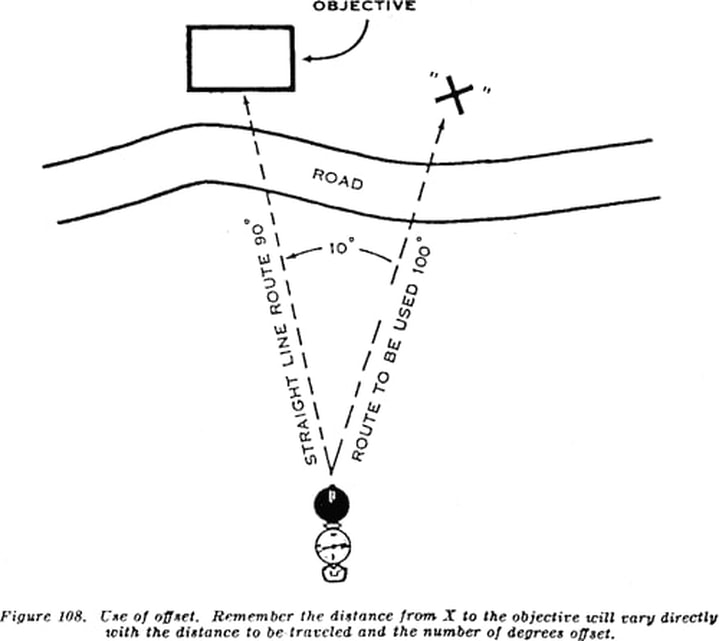
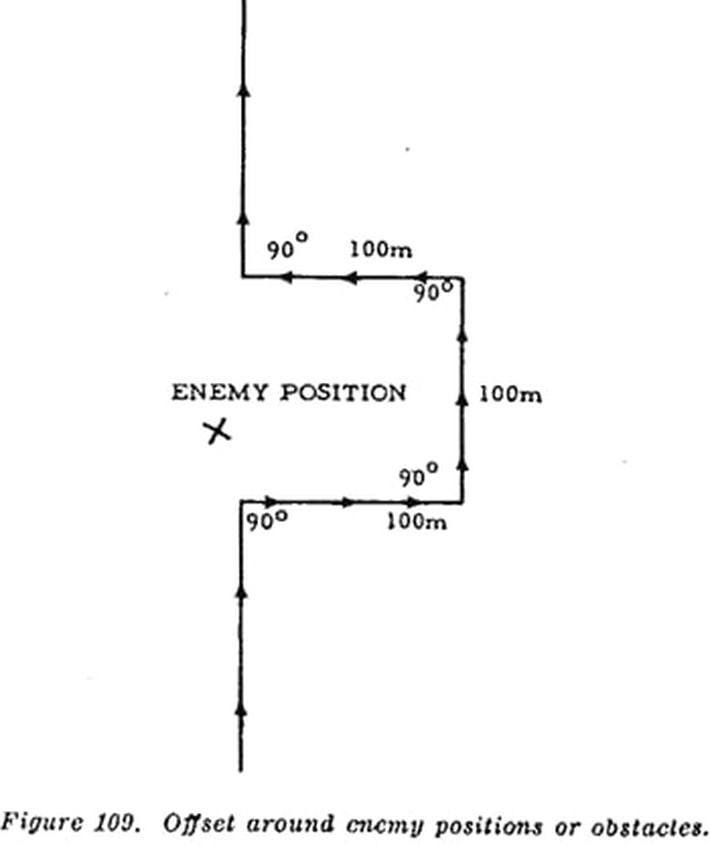
• Bypass enemy positions or obstacles by offsetting around them. Stay oriented by moving at right angles for specified distances. For example, you are moving on an azimuth of 360° and wish to bypass an obstacle or position. Change direction to 90° and move for 100 meters, change direction back to 360° and move for 100 meters, change direction the 270° and move for 100 meters then change direction to 360° and you are back on your original route.
• Avoid lateral movement across the forward portion of the enemy area.
• Over short distances such as the width of a road, the compass can be used for signaling at night. A piece of luminous tape can also be used.
• Crossing roads in enemy territory is a matter of common sense. Each situation may dictate a different method. You will not violate established procedure if you properly reconnoiter before crossing the road. Establish adequate security and move silently and quickly to avoid detection. A main point of consideration in any road crossing is control of your unit. Some of the accepted methods for crossing roads are:
1. Patrol can form a skirmish line and move quickly and quietly across the road.
2. The entire patrol can form a file, following the footsteps of the man in front in order to minimize footprints.
3. Men cross the road a few at a time until patrol is across.
• Crossing streams is similar to crossing roads; reconnaissance and security are necessary.
• Break contact with the enemy by the "clock system," by fire and movement, by a combination of both, or by an immediate action drill.
• Know your location at all times. This is particularly important when you change direction and when you land on an airmobile or water-borne patrol. A relatively slight error can cause you to miss your objective.
• In large patrols, use the chain of command to account for men.
• Use the point for security and not for navigation.
• Check navigation frequently. You are responsible.
• On long patrols, change point and compass men occasionally.
• Use an alternate challenge and password outside friendly areas.
• In mountainous terrain, use ridgelines for movement whenever possible, but do not move along ridgetops. Stay off the skyline.
• Weapons are always carried at a ready position.
• Cut enemy wire only when necessary. Make a reconnaissance first.
• When moving at night, take advantage of any noises such as wind; vehicles, aircraft, battle sounds, and even sounds caused by insects.
• Do not move on roads and trails unless absolutely necessary.
• Aid movement in daylight, especially in dense terrain, by using night compass settings.
• Avoid all human habitations.
• Bypass enemy positions or obstacles by offsetting around them. Stay oriented by moving at right angles for specified distances. For example, you are moving on an azimuth of 360° and wish to bypass an obstacle or position. Change direction to 90° and move for 100 meters, change direction back to 360° and move for 100 meters, change direction the 270° and move for 100 meters then change direction to 360° and you are back on your original route.
• Avoid lateral movement across the forward portion of the enemy area.
• Over short distances such as the width of a road, the compass can be used for signaling at night. A piece of luminous tape can also be used.
• Crossing roads in enemy territory is a matter of common sense. Each situation may dictate a different method. You will not violate established procedure if you properly reconnoiter before crossing the road. Establish adequate security and move silently and quickly to avoid detection. A main point of consideration in any road crossing is control of your unit. Some of the accepted methods for crossing roads are:
1. Patrol can form a skirmish line and move quickly and quietly across the road.
2. The entire patrol can form a file, following the footsteps of the man in front in order to minimize footprints.
3. Men cross the road a few at a time until patrol is across.
• Crossing streams is similar to crossing roads; reconnaissance and security are necessary.
• Break contact with the enemy by the "clock system," by fire and movement, by a combination of both, or by an immediate action drill.
• Know your location at all times. This is particularly important when you change direction and when you land on an airmobile or water-borne patrol. A relatively slight error can cause you to miss your objective.
Section III. MISCELLANEOUS
• Keep the cutting edge of the entrenching tool extremely sharp. It is a good silent weapon and can be used in lieu of a machete.
• A garrote can be used for killing a sentry or capturing a prisoner.
• Do not jeopardize security by letting ear flaps and hoods interfere with the hearing ability of the patrol.
• Keep talking to a minimum. Use arm-and-hand signals to the maximum.
• When reconnoitering enemy positions, keep a covering force within supporting distance of the reconnaissance element.
• Never throw trash on ground while on patrol. Bury and camouflage it to prevent detection by the enemy.
• When contacting friendly agents such as partisans, never take the entire patrol to make contact. Have one man make the contact and cover him.
• Dark, rainy, windy nights are best for patrols.
